How to Create a CRUD App with Firebase V9 and React
Sep 2023 · 22 min
Explore the full potential of Firebase v9 and React as I walk you through the step-by-step process of building a robust CRUD (Create, Read, Update, Delete) application.
.png&w=3840&q=75)
Overview
The release of Firebase v9 SDK brings a modular approach to its API, and this impacts how we work with services like Firestore. In this tutorial, we'll simplify the process of performing CRUD (Create, Read, Update, Delete) operations in Firestore by creating a simple to-do list application.
If you're already familiar with React, React Hooks, and Firebase v8, you're in the right place. Just ensure you have Node.js installed on your machine to follow along.
App Demo
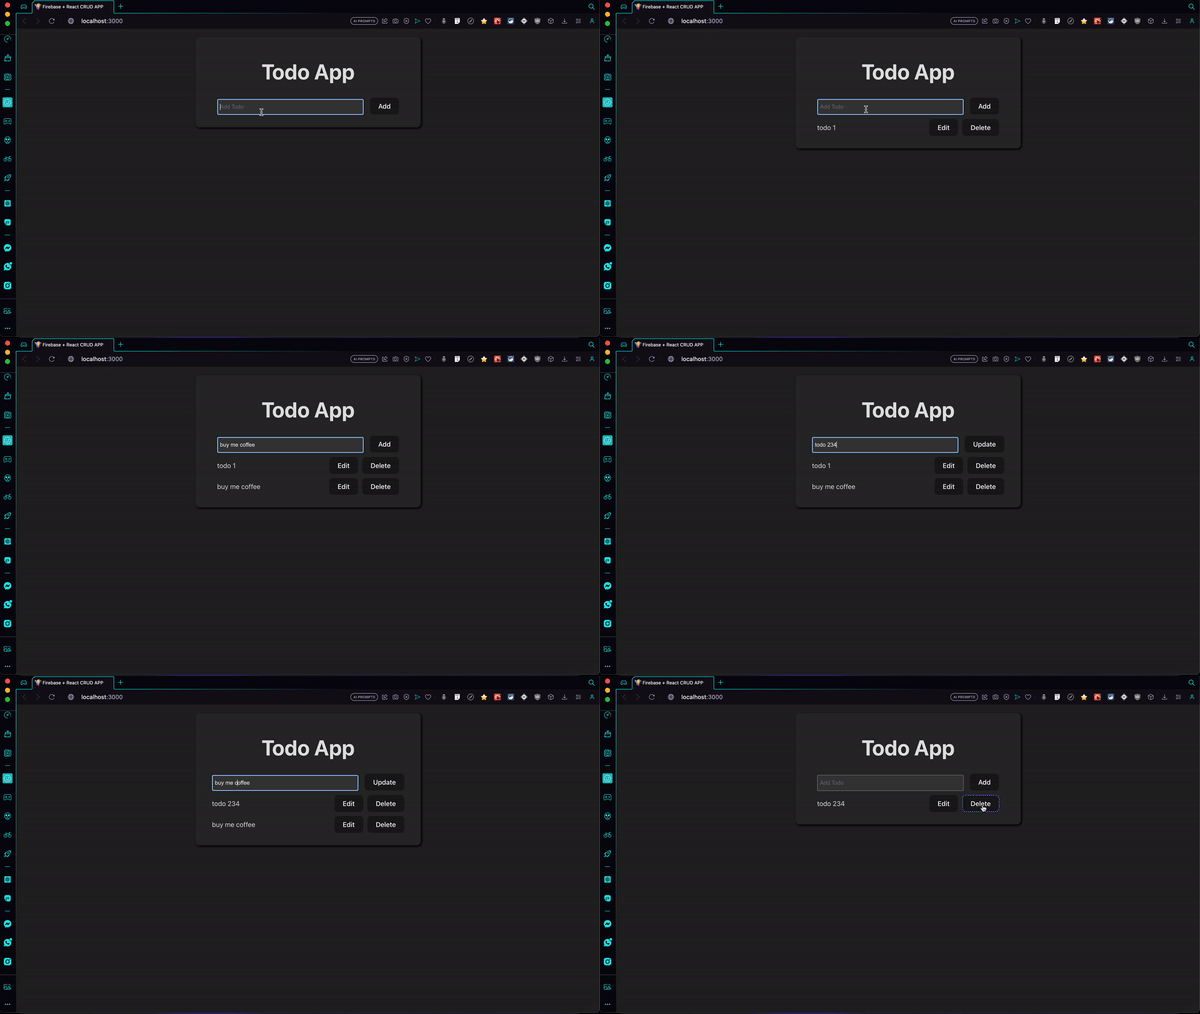
Setting Up Your React Project
First of all, we will create a react project using Vite, as it has a fast hot module reload that helps us in development by compiling our project very fast.
To create an app using Vite, run this command
yarn create vite
// or with npm
npm create vite@latest
It will ask the details in steps as following
- Project name → for that we will name this project react-firebaseV9-crud

- Project template → for template/framework we will choose React
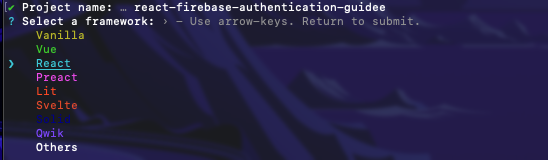
- Project language → and finally we will select javascript as the language for this project

- After creating the project, the final steps are to go into the folder by using cd command
- After that, install the dependencies using yarn or npm install
After this, we will install Firebase package in our app using the following command.
yarn add firebase
And finally, we will start our project using the following command. Make sure you run this command in your project directory.
It will start our project at port http://127.0.0.1:5173/
If you want to use localhot:3000, then you can update the vite.config.js file like this.
vite.config.js
import { defineConfig } from "vite";
import react from "@vitejs/plugin-react";
// https://vitejs.dev/config/
export default defineConfig({
plugins: [react()],
server: {
port: 3000,
},
});
After setting up our react project, now it’s time to create our firebase project.
Configuring Firebase for Your Project
To begin, you need to access the Firebase console by visiting the following URL: https://console.firebase.google.com. Once you're there, follow these steps:
- Click on "Add Project" to create a new project.
- Provide a name for your project. → the name here is from another project setup but you can change your project’s name to whatever you like and the rest is same.

Afterward, ensure that analytics is turned off by selecting the corresponding option. Then, click on "Create Project" and patiently wait for a moment. Once the project is successfully created, you will be redirected to the Firebase project console.

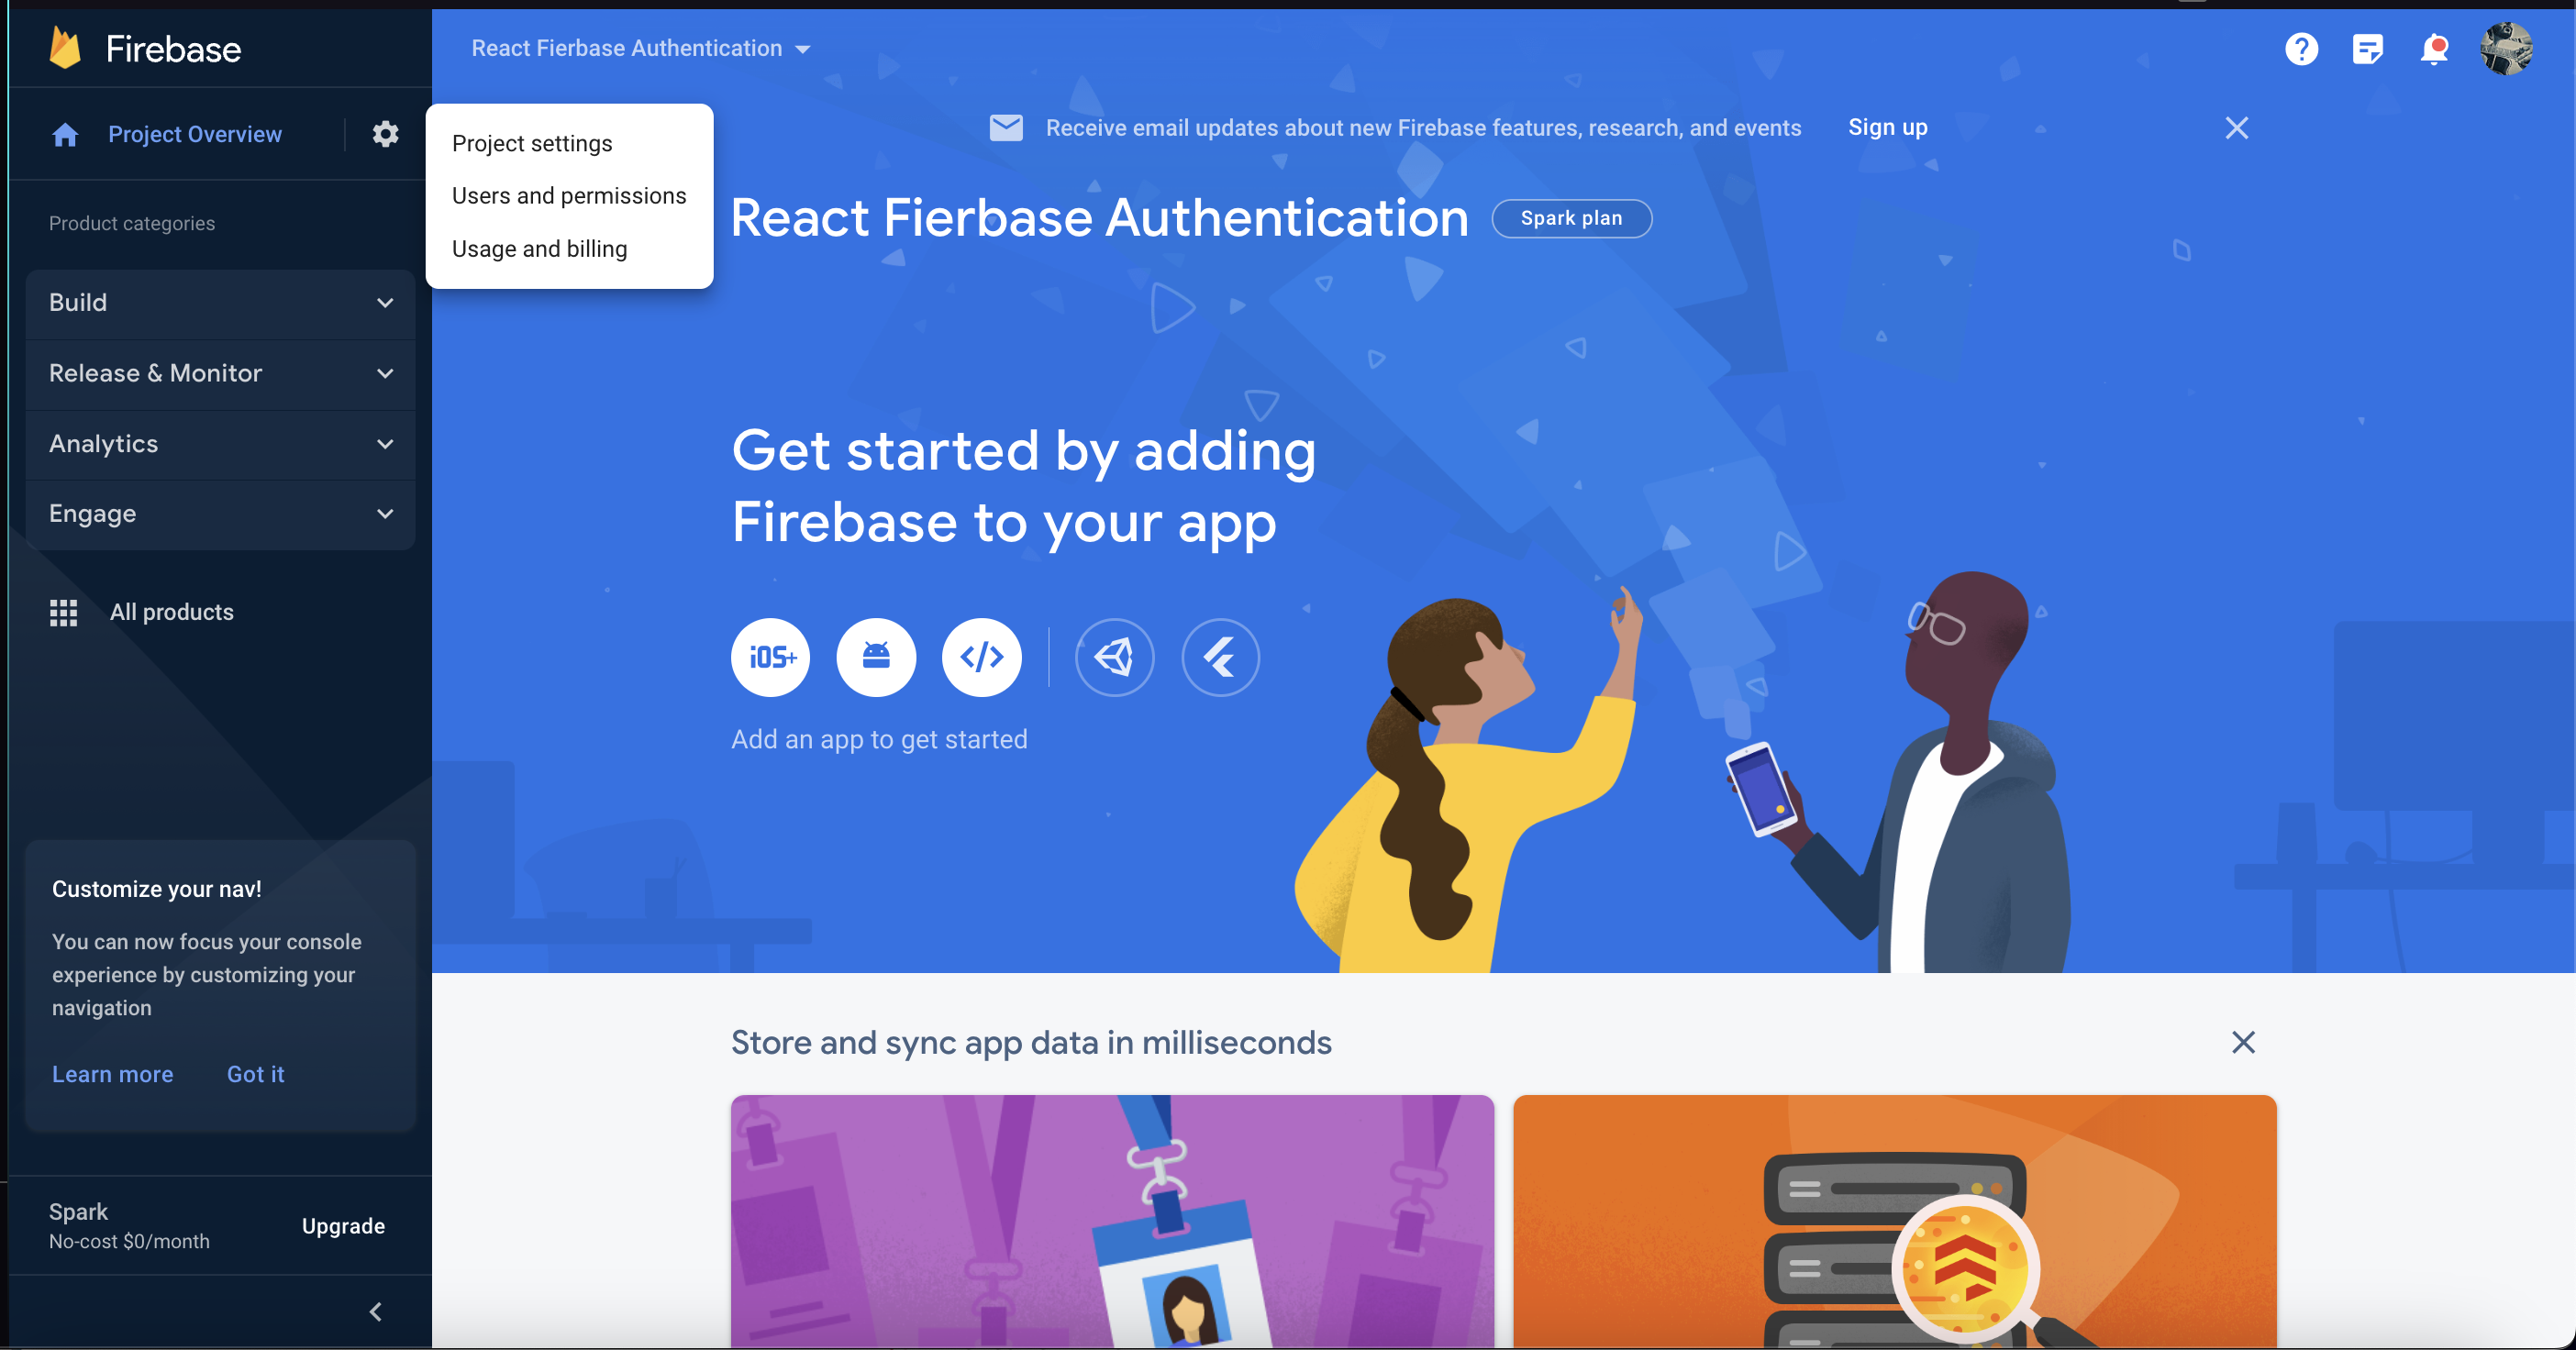
Next, navigate to the project settings by locating and clicking on the settings gear icon located in the top left section, as illustrated below.
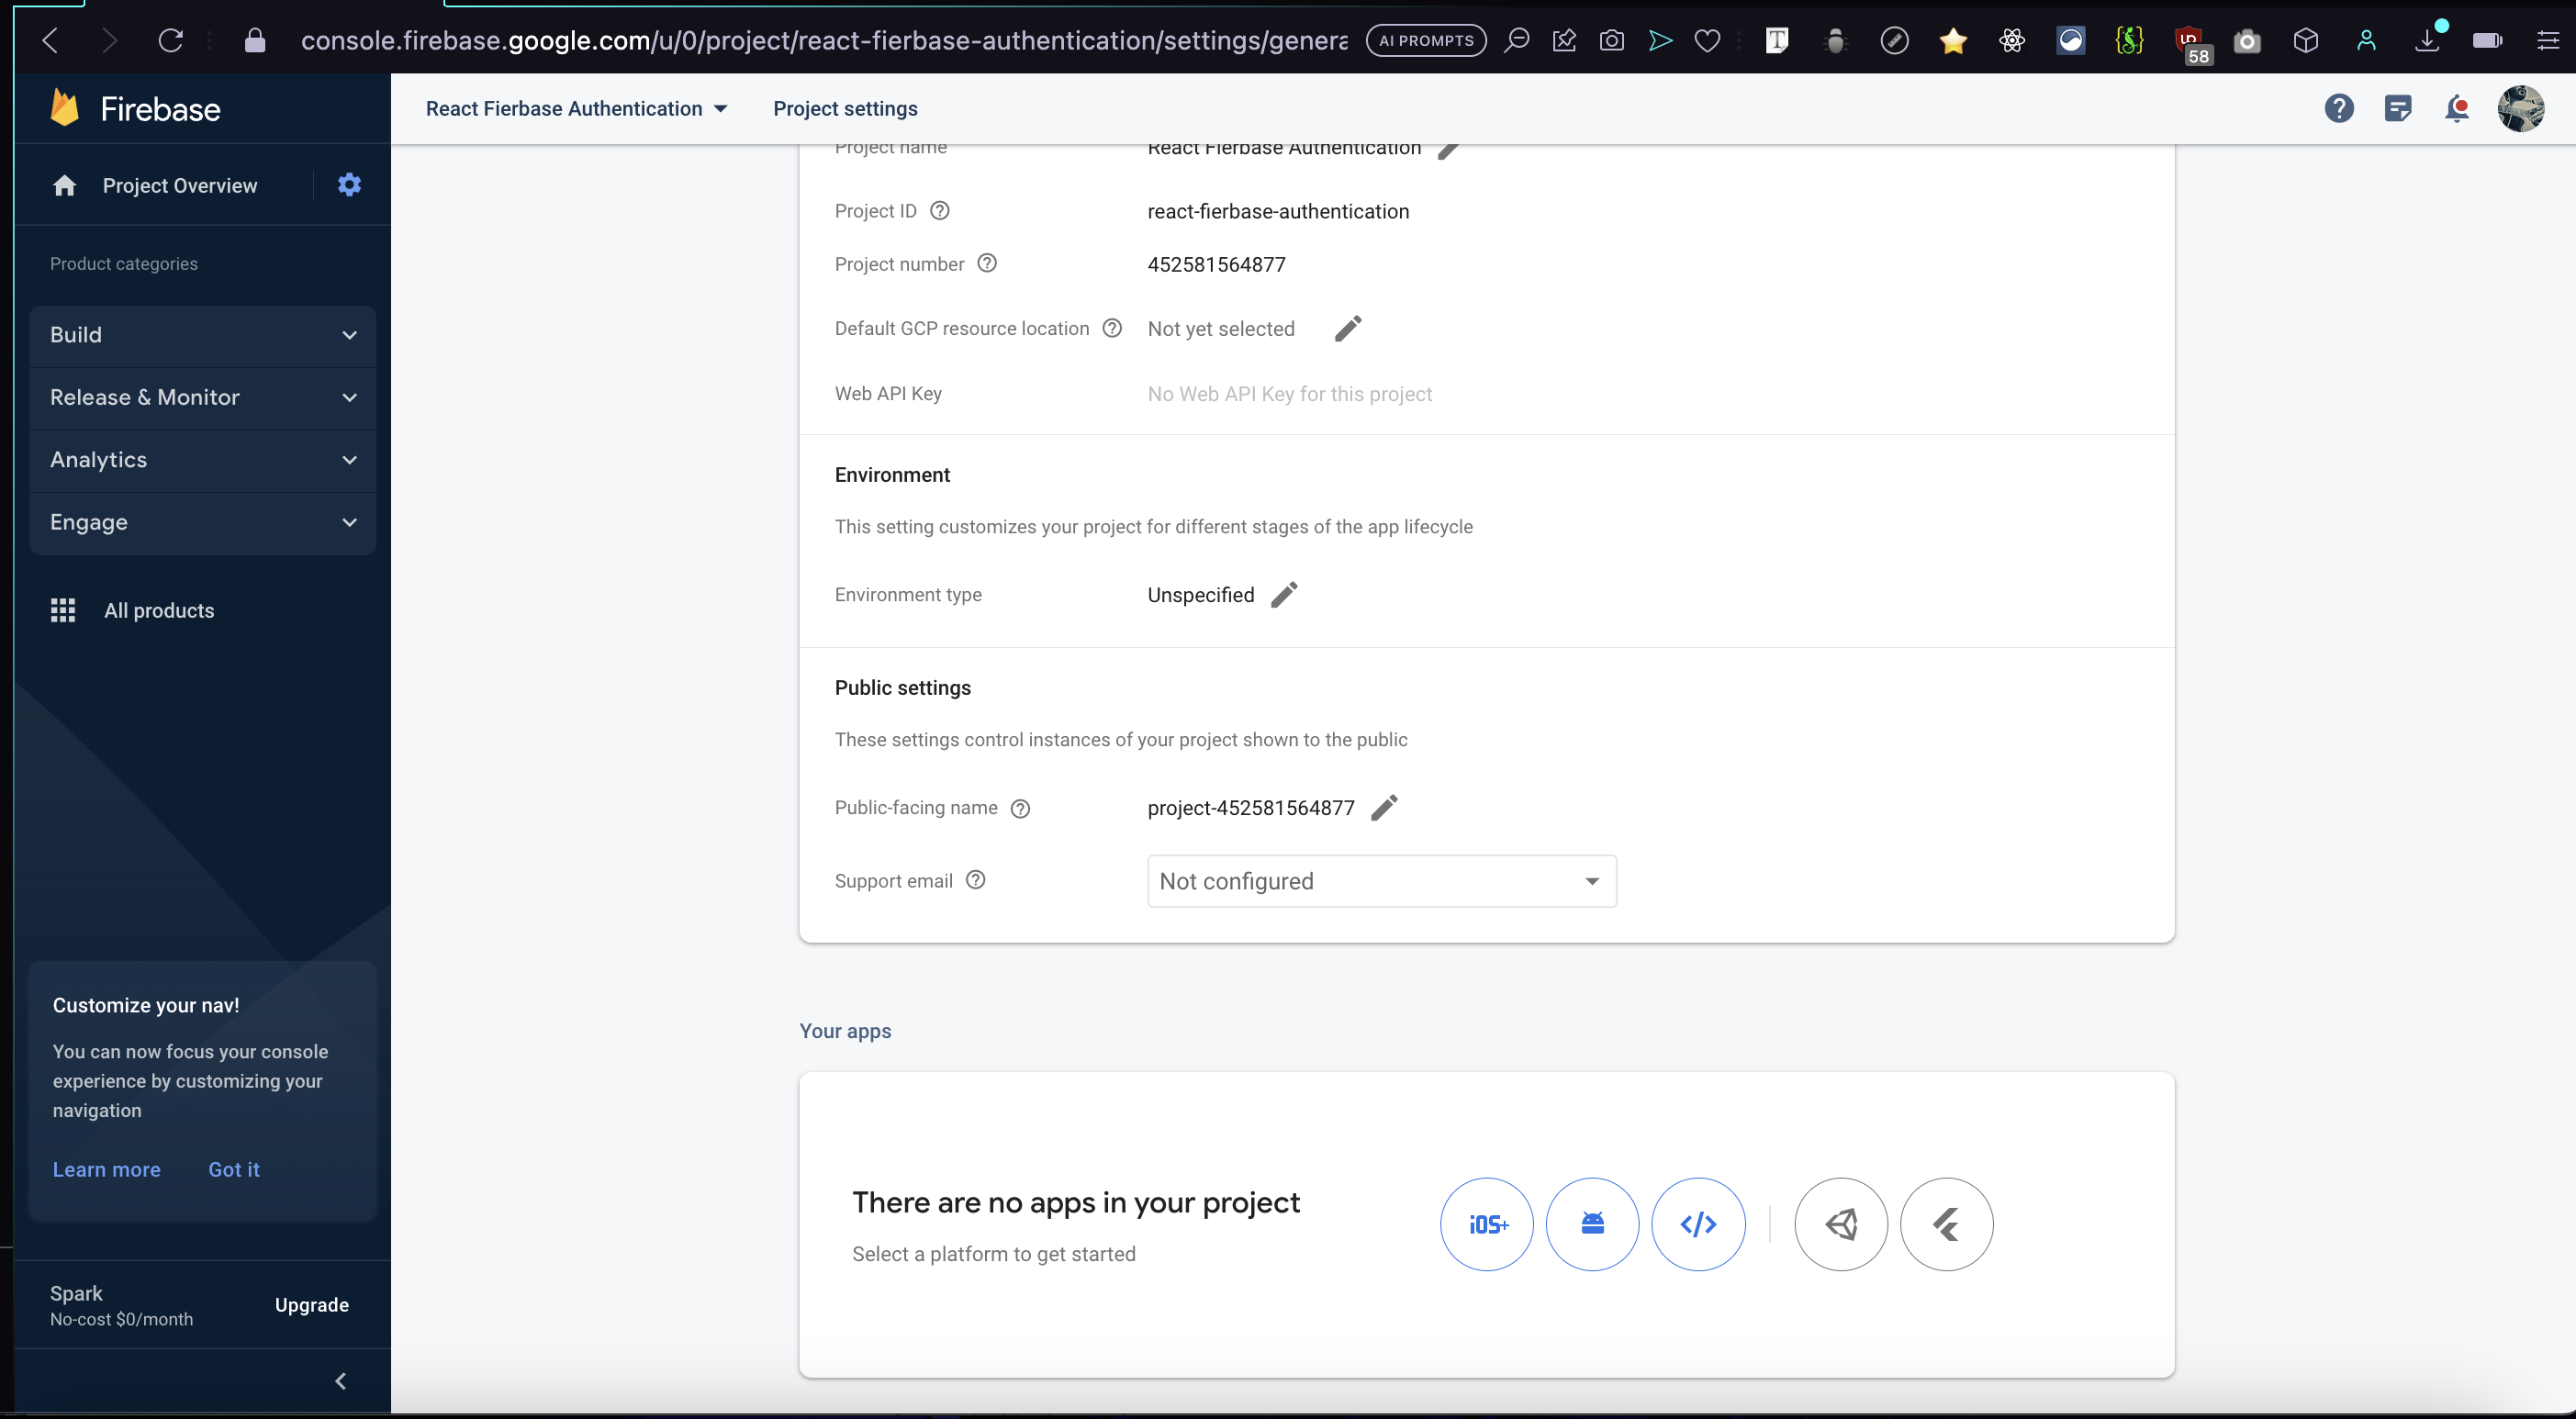
Once you have accessed the project settings, you will encounter a screen resembling the following. Your next step is to add a web app using Firebase. To proceed, click on the icon resembling brackets, which represents the option for adding a web app.
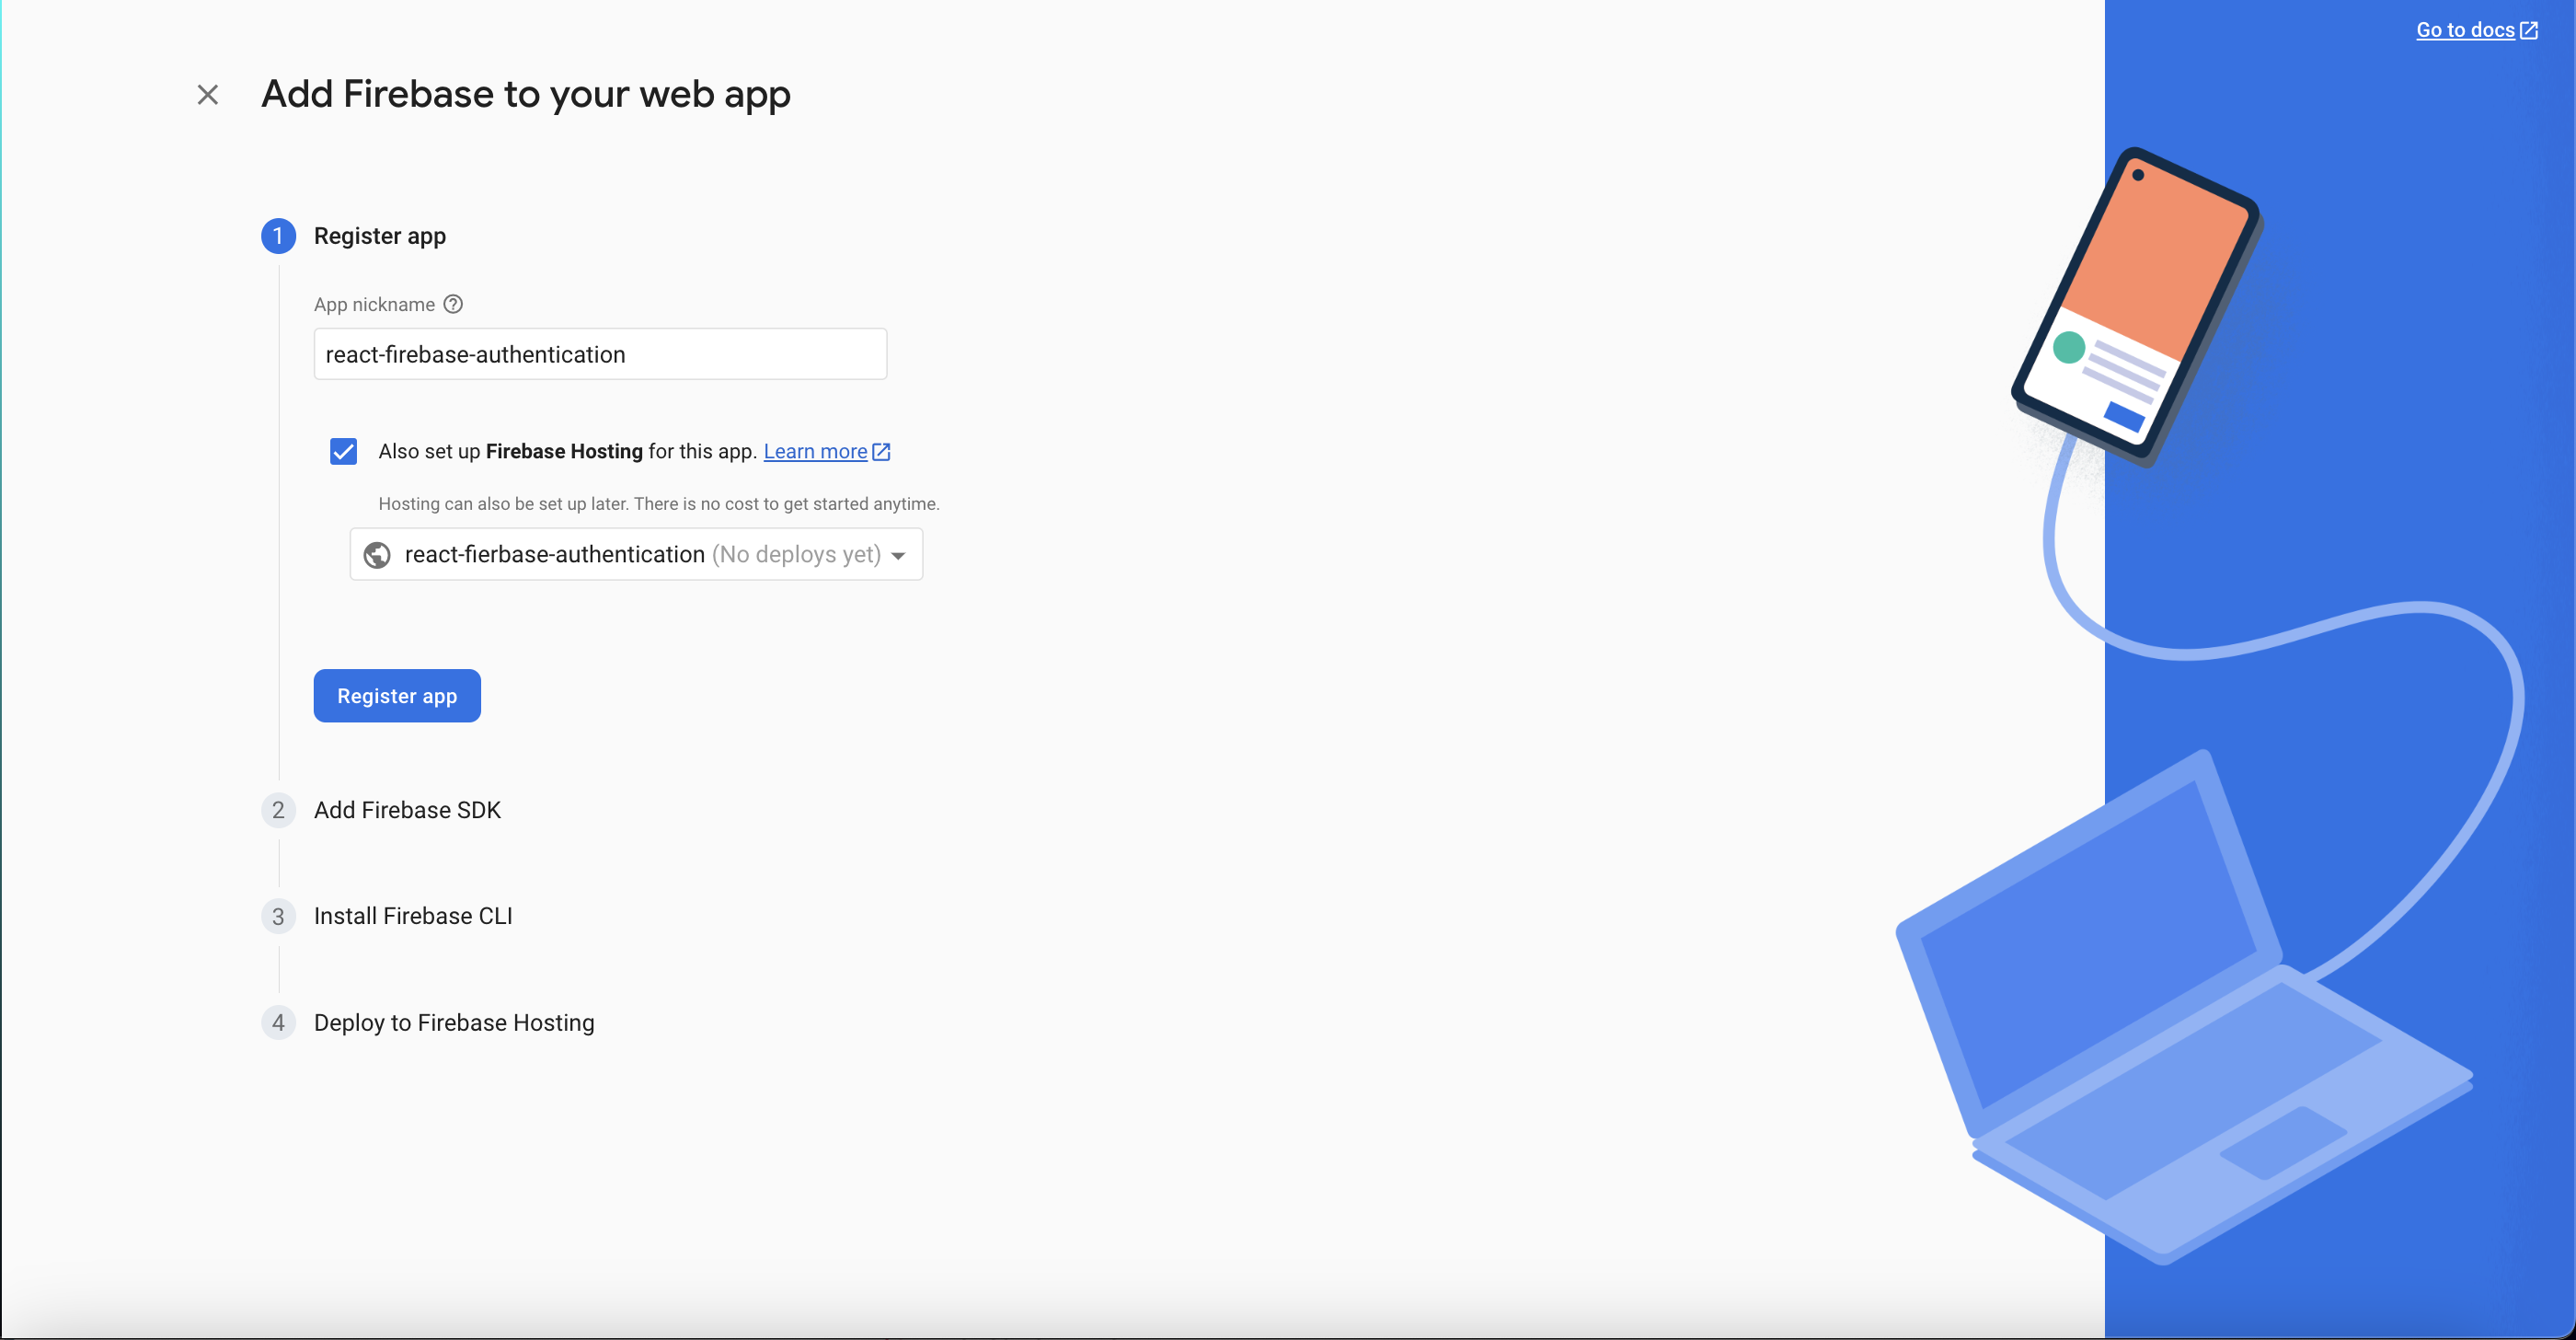
After selecting the web app option, provide a suitable name for your web app in the designated field, as shown below. Once you've named your web app, click on "Register App" to proceed.
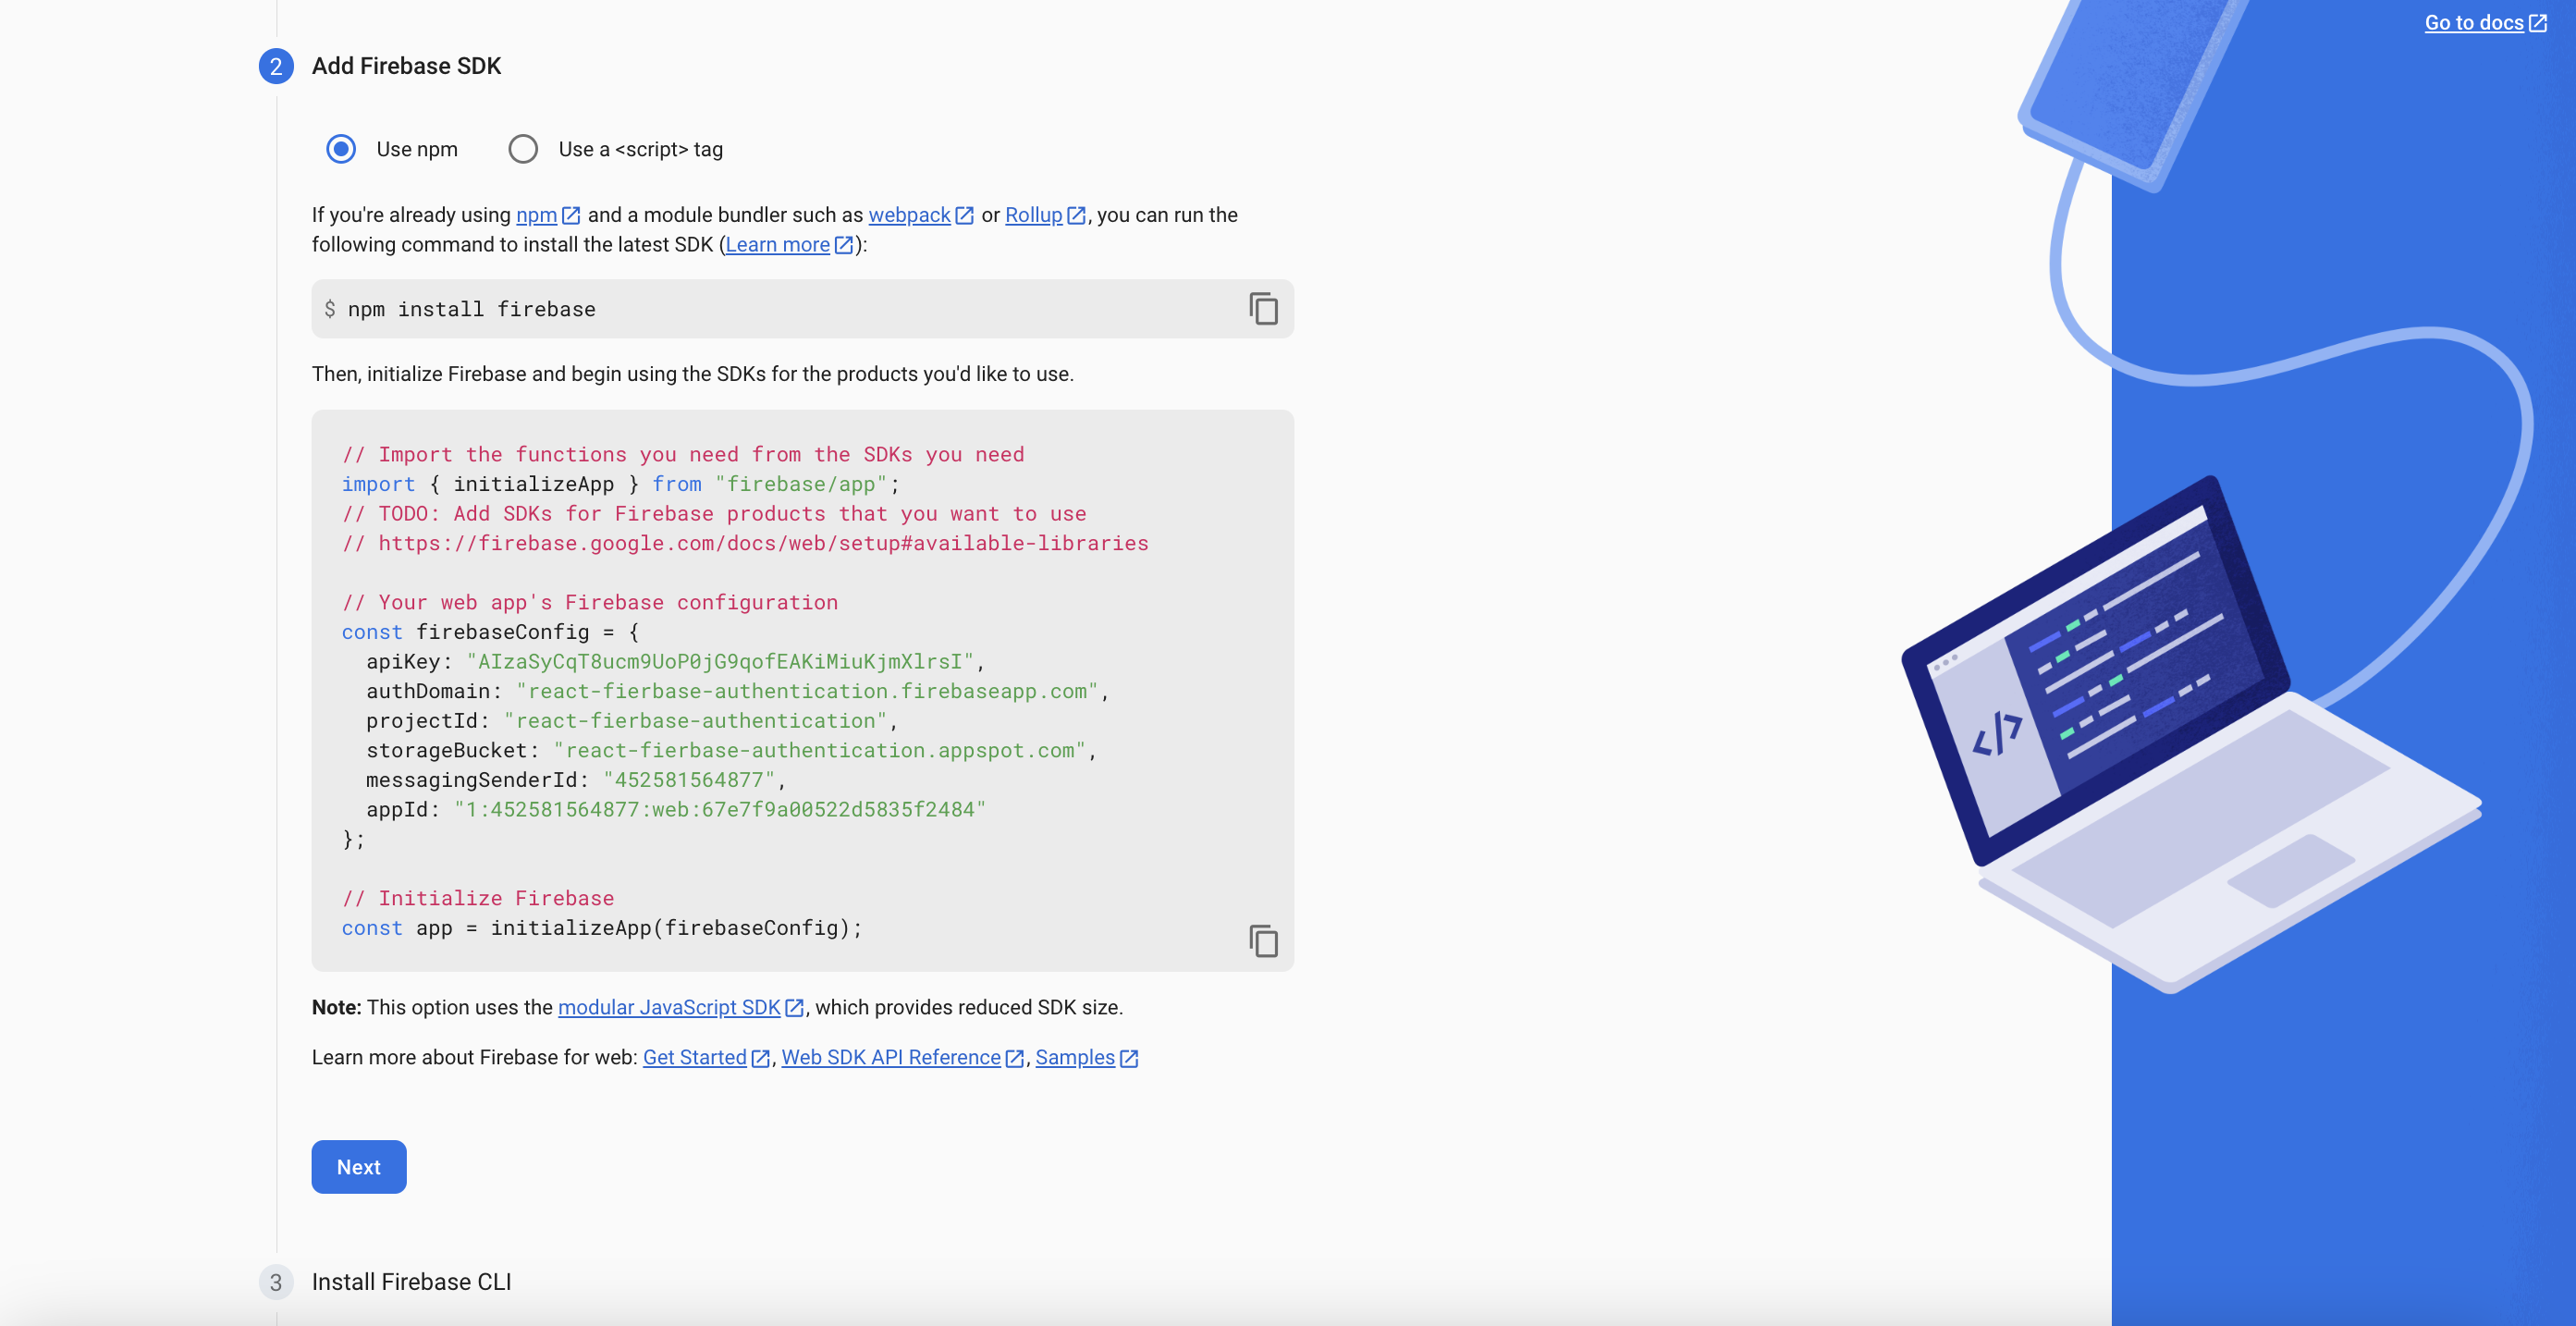
Upon clicking "Register App," you will be presented with the Firebase installation guide. However, since you have already installed Firebase, you can skip this step. Instead, you should focus on copying the Firebase configuration settings, as demonstrated below. Once you have copied the configuration settings, click on "Next" to proceed.
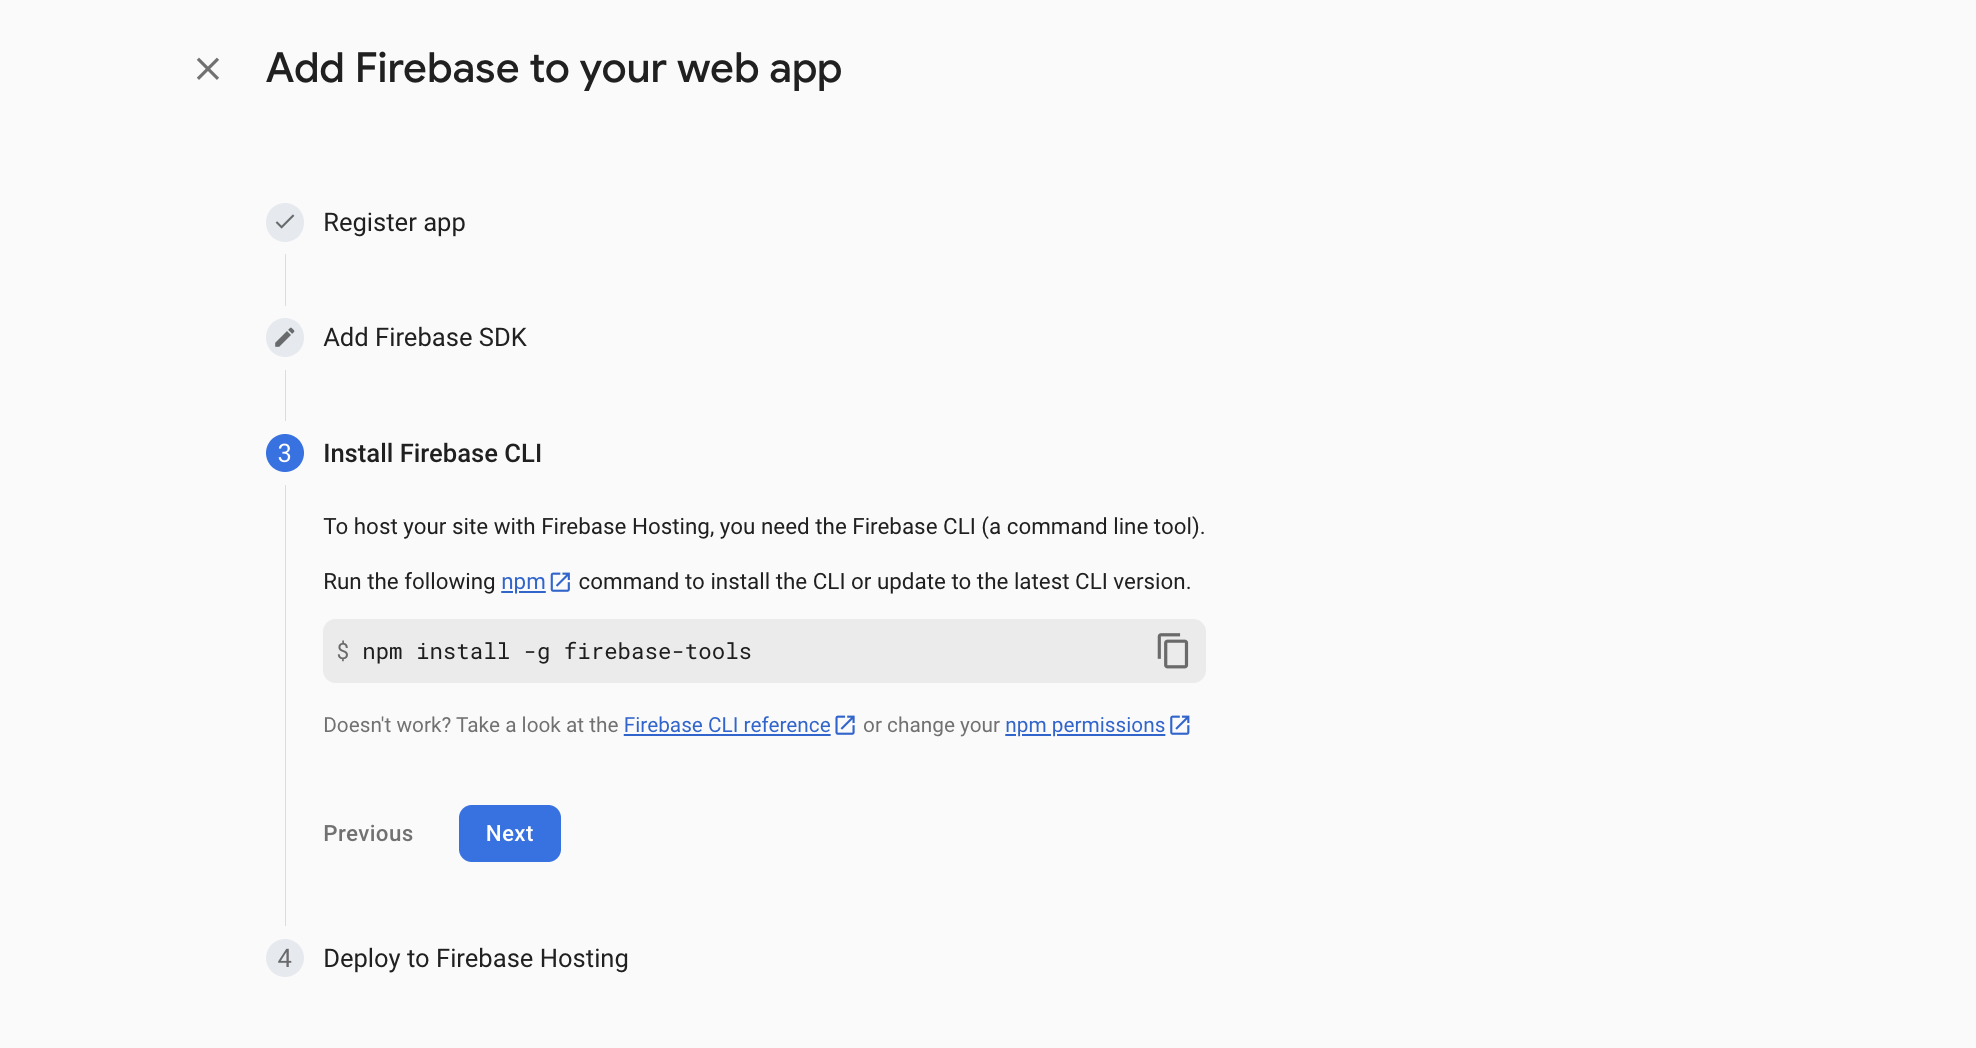
After clicking "Next," you will have the option to install Firebase tools if you haven't done so already. You can proceed with this installation by following the provided instructions. Once you have completed the installation, click on "Next" and then click on "Go to the console" to proceed.
Excellent! With this, your web app setup with Firebase is complete. Now, let's move on to enabling authentication for your project. Follow these steps:
- Click on the "Build" tab.
- and then click on the firestore and you will be redirected to this page
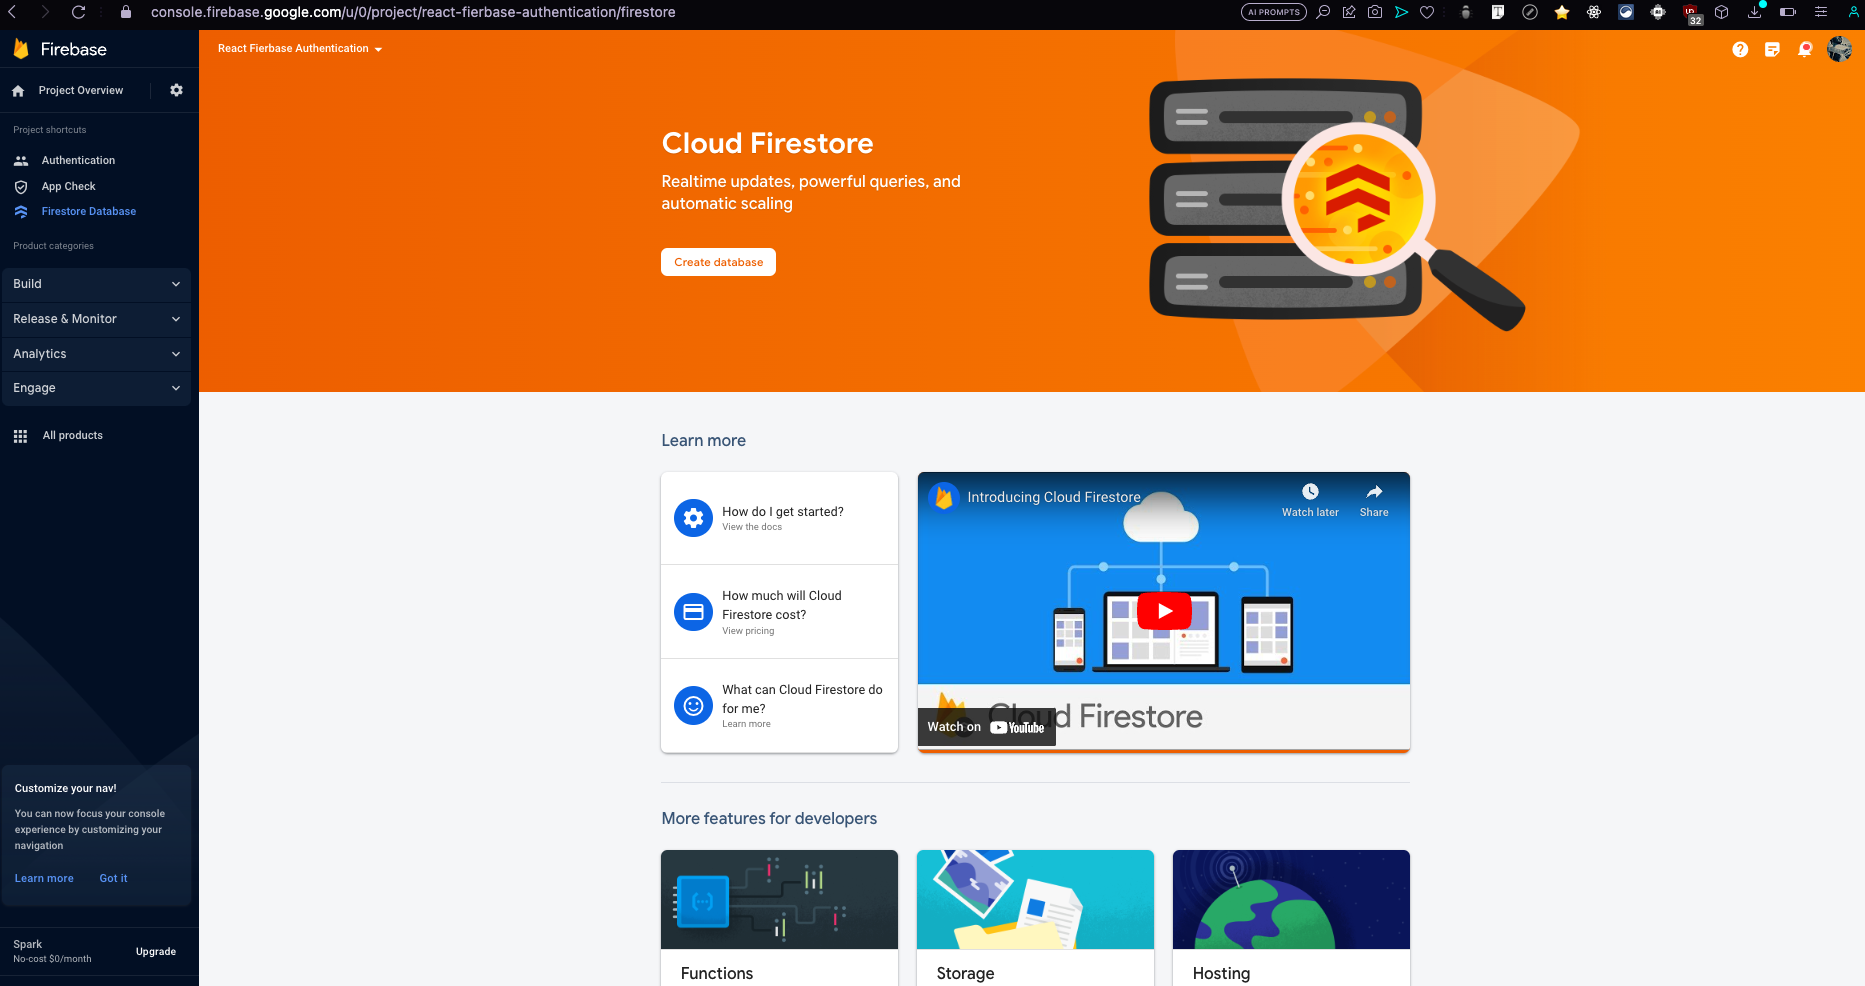
On this view click on the create database button to get started.
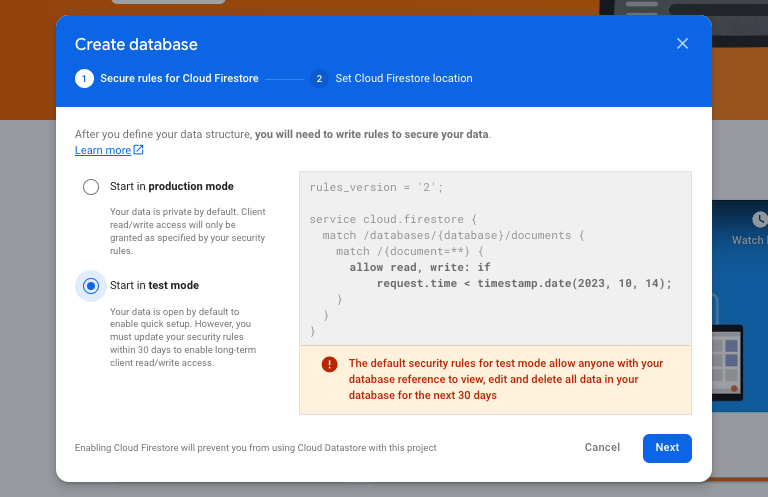
After clicking on the create database you will see this popup. Here we are creating the database in test mode but in a production app it should be in standard mode.
After selecting the mode click next.
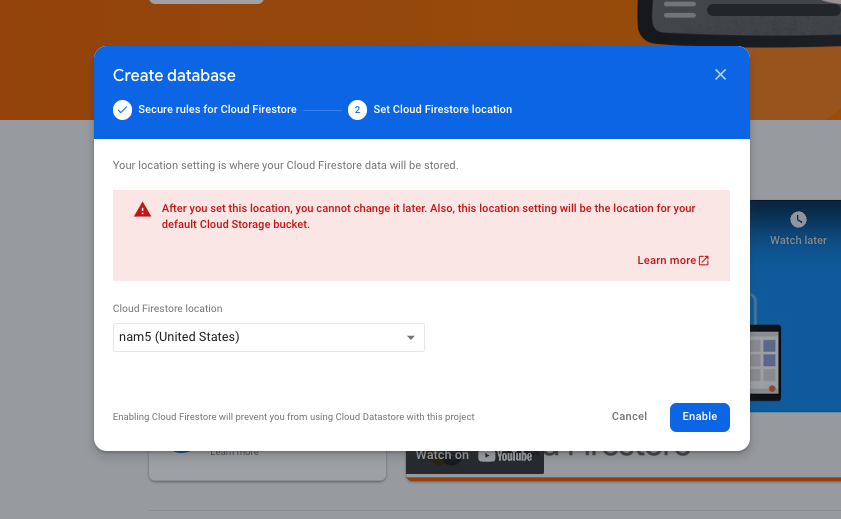
On Clicking next you will see this. Here you need to select the location where you want to create your database.
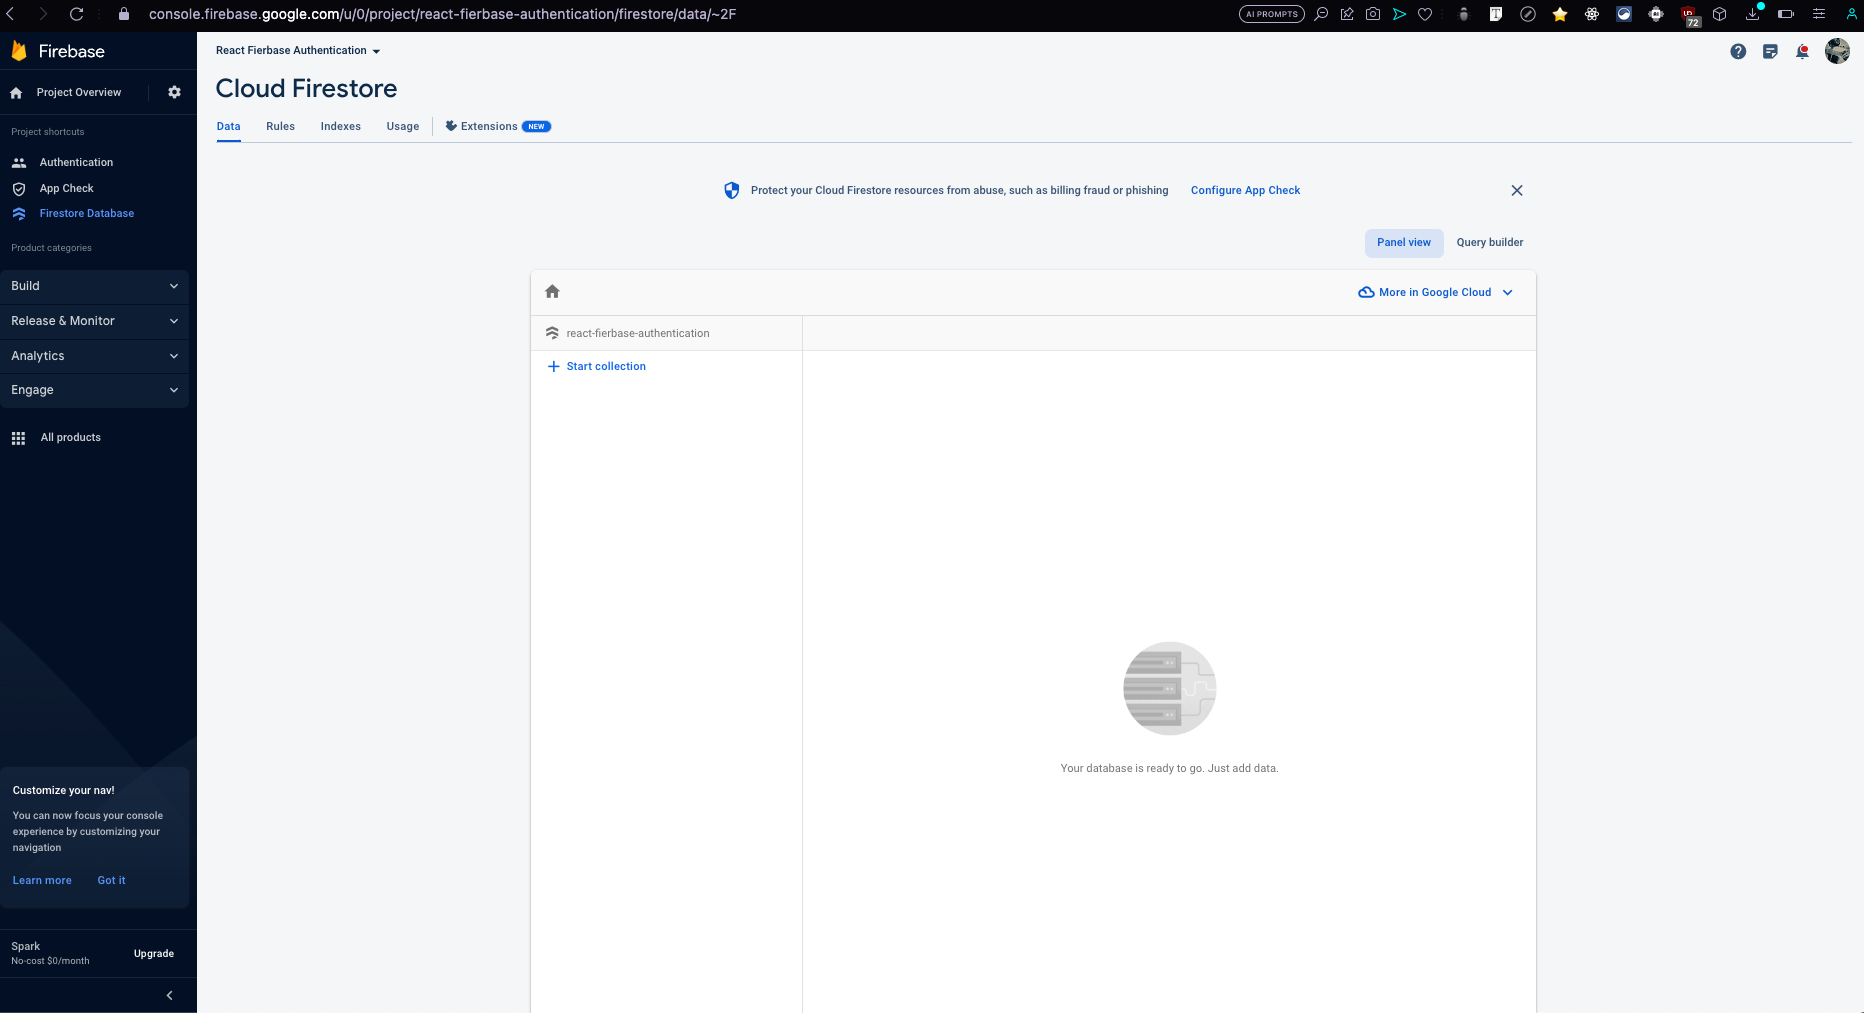
After enabling this you will see the empty collection view.
Here you need to click on start collection in order to make a new collection in firestore.
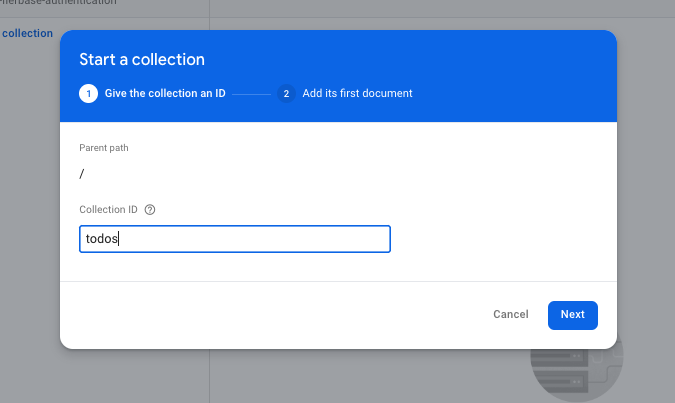
After clicking you will see this popup, you need to give your collection a name. We will name it as todos in this blog and then click next button.
After clicking next you can create a document with custom id or autoID and then add a field inside the document called todo with a string value and click save.
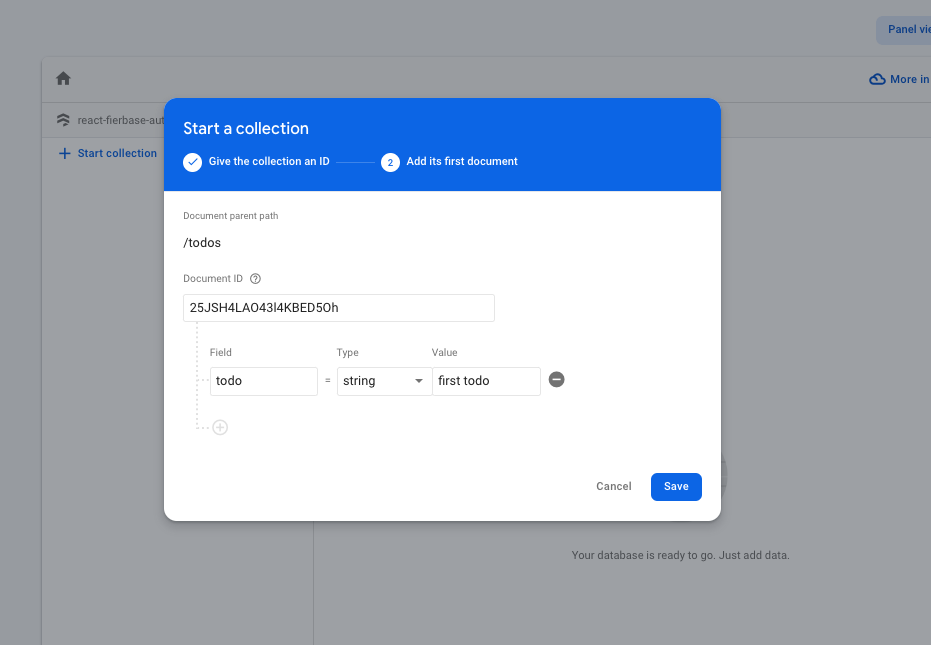
After saving you will now have a collection called todos with a document inside the todos collection like this.

Congratulations! With this step, your Firebase project setup is now complete. Now we will start react and firebase integration.
Integrating Firebase with React
With our project setups complete, it's time to seamlessly integrate Firebase into our React application. Follow these steps to get started:
- Create a Firebase Configuration File: Navigate to the src folder of your React project and create a file named firebase.js.
- Retrieve Firebase Configuration: In the Firebase console, locate the project configuration for your web app.
- Copy and Paste Configuration: Copy the project configuration details and paste them into the firebase.js file, replacing the existing placeholder configurations.
Here's the content of the firebase.js file:
import { initializeApp } from "firebase/app";
import {
doc,
onSnapshot,
addDoc,
collection,
query,
updateDoc,
deleteDoc,
getFirestore,
} from "firebase/firestore";
// Your web app's Firebase configuration
const firebaseConfig = {
apiKey: "AIzaSyCqT8ucm9UoP0jG9qofEAKiMiuKjmXlrsI",
authDomain: "react-fierbase-authentication.firebaseapp.com",
projectId: "react-fierbase-authentication",
storageBucket: "react-fierbase-authentication.appspot.com",
messagingSenderId: "452581564877",
appId: "1:452581564877:web:67e7f9a00522d5835f2484",
};
// Initialize Firebase
const app = initializeApp(firebaseConfig);
export default app;
export const db = getFirestore(app);
// Exporting everything that we need from firebase
export { doc, onSnapshot, addDoc, collection, query, updateDoc, deleteDoc };
In this file, we initialize and export the Firebase app, along with the necessary Firebase functions, using your project's configuration. This approach allows us to centralize the usage of Firebase functions in our app, all managed from this firebase.js file.
Adding Data to Firestore
To make your CRUD application functional, it's essential to know how to add data to Firestore. In this section, we'll guide you through the process step by step.
Step 1: Creating the Input Form
To begin, we need an input form where users can enter their to-do items. Here's the form structure in React:
<form className="form" onSubmit={onSubmit}>
<input
type="text"
placeholder="Add Todo"
value={todoValue}
onChange={handleOnChange}
/>
<button type="submit">Add</button>
</form>
This form includes an input field and an "Add" button.
As you can see in the code snippet for Step 1, setting up a form requires a few essential components:
- State for Storing Input: We create a state variable to store the input value.
- onChange Handler: An onChange handler is used to update the state as the user types.
- onSubmit Function: The onSubmit function is responsible for submitting or adding the to-do item to Firestore.
Let's dive into each of these components to build our form effectively."
Step 2: Managing the State
To capture and manage the input value, we'll create a state variable called todoValue using React's useState hook:
import React, { useState } from "react";
const [todoValue, setTodoValue ] = useState("")
Step 3: Handling Input Changes
Next, we need an onChange handler to update the todoValue state whenever the user types something:
const handleOnChange = (e) => setTodoValue(e.target.value);
Step 4: Submitting Data to Firestore
Finally, to submit the input value to Firestore, we'll create an onSubmit function. This function will interact with Firestore using the Firebase v9 SDK:
import { db, collection, addDoc } from "../firebase";
const onSubmit = async (e) => {
e.preventDefault();
if (!todoValue) return; // to check if the value is empty or not
try {
const doc = await addDoc(collection(db, "todos"), {
todo: todoValue,
});
console.log("Todo added : ", doc.id);
setTodoValue(""); // Clear the input field after adding the todo
} catch (err) {
console.log("error in adding todo", err);
}
};
In the code snippet above, you'll notice that we're importing several elements from our Firebase configuration file. Let's break down what each of these imports does:
- db: This represents the Firestore instance we initialized in our firebase.js during app initialization.
- collection: Firestore collections are containers for documents. In Firebase v9, collection is a function used to reference or point to the desired collection within Firestore.
- addDoc: Firebase v9 provides the addDoc function, which allows us to add new documents to the Firestore collection. It takes a reference to the collection and the data we want to add as its parameters. Right now, it’s just a simple todo value, but you can add here whatever you want.
So, with these components in place, here's the complete code for adding a to-do item to Firestore using Firebase v9 and React.
// AddTodo.jsx
import React, { useState } from "react";
import { db, addDoc, collection } from "../firebase";
const AddTodo = () => {
const [ todoValue, setTodoValue ] = useState("");
const handleOnChange = (e) => setTodoValue(e.target.value);
const onSubmit = async (e) => {
e.preventDefault();
try {
const doc = await addDoc(collection(db, "todos"), {
todo: todoValue,
});
console.log("Todo added : ", doc.id);
setTodoValue("");
} catch (err) {
console.log("error in adding todo", err);
}
};
return (
<form className="form" onSubmit={onSubmit}>
<input
type="text"
placeholder="Add Todo"
value={todoValue}
onChange={handleOnChange}
/>
<button type="submit">Add</button>
</form>
);
};
export default AddTodo;
Fetching data from the Firestore
Now that we've successfully added data to Firestore, it's time to learn how to retrieve that data and display it in our React application. In this section, we'll delve into the process of fetching data from Firestore, allowing you to provide dynamic and up-to-date content to your users.
Step 1: Import Dependencies
To interact with Firebase and Firestore in your React component, you'll need to import essential dependencies.
import { useState, useEffect } from "react";
import { db, doc, onSnapshot, collection, query } from "../firebase";
Here's what each of these imports does:
-
useState and useEffect are React hooks that enable you to manage state and side effects in functional components.
-
db: This import represents the Firestore instance that you initialized during your app's setup in the firebase.js file. It allows you to interact with your Firestore database.
-
doc, onSnapshot, collection, query, and deleteDoc: These are Firebase Firestore functions that facilitate various operations on your Firestore database:
doc: Represents a specific document in Firestore.
onSnapshot: Allows you to listen for real-time changes in Firestore documents or collections.
collection: Refers to a specific collection in Firestore.
query: Creates a query for Firestore to fetch data from a collection or collection group.
By importing these dependencies, you're equipping your React component with the tools needed to communicate with Firebase and Firestore, making it possible to fetch and manage your to-do list data seamlessly.
Step 2: Initialize State
In this step, we're setting up the essential state variables that will hold the to-do list data in your React component.
const [todos, setTodos] = useState([]);
Step 3: Fetch data from the Firestore
This step is where we interact with Firestore to retrieve your to-do list data and make it available for use within your React application.
useEffect(() => {
const q = query(collection(db, "todos"));
const unsubscribe = onSnapshot(q, (snapShot) => {
const todosArray = [];
snapShot.forEach((doc) => {
const todo = { ...doc.data(), docId: doc.id };
todosArray.push(todo);
});
setTodos(todosArray);
});
return () => unsubscribe();
}, []);
Code Explanation:
Now, let's dive into what's happening in the code snippet above:
- useEffect Hook: useEffect Hook is used to manage side effects in functional components. In this case, it allows us to fetch data from Firestore when the component is initially rendered.
- Setting Up a Query: We begin by creating a query (q) using the query function. This query is directed at the "todos" collection in Firestore. The collection function, part of the Firebase Firestore library, specifies which collection we want to retrieve data from. In this function collection(db, "todos"), db is referring to the firestore instance that we created using our credentials, and “todos” is the name of the collection we want to use.
- Listening for Changes with onSnapshot: Now, let's uncover the real magic of Firestore. The onSnapshot function is where the dynamic data connection comes to life. This function takes a query and a callback function as its parameters, with the callback function receiving a snapshot of the data within.
- Establishing a Live Connection: With onSnapshot, we establish a live and real-time connection to the "todos" collection in Firestore. This means that any changes made to this collection, whether it's adding new to-do items, updating existing ones, or even deleting tasks, will promptly trigger this function.
- Initial Fetch and Continuous Updates: Importantly, this connection doesn't just fetch data once; it does so on the initial page render and continues to refresh the data whenever there's any change in the collection. This ensures that your to-do list remains not only up-to-date but also responsive to every modification, delivering a seamless user experience.
- Processing the Snapshot: When Firestore sends us a snapshot of the data, we process it inside the callback function. We initialize an empty array todosArray to hold or store our to-do items.
- Looping Through Documents: We iterate through each document in the snapshot using the forEach method. For each document, we extract its data using doc.data() and also obtain its unique identifier (doc.id). This information is merged into a todo object using the spread operator.
- Updating todosArray: We push each todo object into the todosArray. After processing all documents, todosArray contains your complete to-do list. Remember that this todoArray is just a temporary array that we use to get all the todos from Firebase.
- Updating State: The final step in the onSnapshot callback is to update the todos state using the setTodos function. This sets your component's state to the newly fetched and processed to-do list data that is inside the todosArray, triggering a re-render of your component with the updated data.
- Cleanup with unsubscribe: It's essential to return a cleanup function from useEffect. In this case, unsubscribe is the cleanup function. It stops the live connection to Firestore when the component un-mounts. This ensures that you don't have unnecessary listeners running when the component is no longer in use, which is good for performance.
In summary, this step establishes a live connection to your Firestore "todos" collection, fetches data, processes it, and updates the todos state in your React component. This dynamic connection allows your to-do list to stay up-to-date in real-time as changes occur in Firestore.
Step 4: Display the To-Do List
Finally, map through the todos array and render each to-do item, providing options for editing and deleting:
return (
<div className="list">
{todos.map((item) => (
<div key={item.docId} className="todo-item">
{item.todo}
<div>
<button onClick={() => {}}>Edit</button>
<button onClick={() => {}>Delete</button>
</div>
</div>
))}
</div>
);
With these steps, you can fetch data from Firestore and display your to-do list dynamically in your React application.
So after all these steps, the final code will look something like this:
// TodoList.jsx
import { useState, useEffect } from "react";
import { db, doc, onSnapshot, collection, query } from "../firebase";
const TodosList = () => {
const [todos, setTodos] = useState([]);
useEffect(() => {
const q = query(collection(db, "todos"));
const unsubscribe = onSnapshot(q, (snapShot) => {
const todosArray = [];
snapShot.forEach((doc) => {
const todo = { ...doc.data(), docId: doc.id };
todosArray.push(todo); //updating the array
});
setTodos(todosArray); //updating the actual state
});
return () => unsubscribe();
}, []);
return (
<div className="list">
{todos.map((item) => (
<div key={item.docId} className="todo-item">
{item.todo}
<div>
<button onClick={() => {}}>Edit</button>
<button onClick={() => {}}>Delete</button>
</div>
</div>
))}
</div>
);
};
export default TodosList;
Updating data from the Firestore
Now, let's dive into the process of updating a to-do item, building upon the foundation of adding and fetching data.
Understanding the Update Process:
Before we start updating to-do items, it's essential to grasp how this process actually works.
As you recall, when you loop through your to-do list and display it, we added an empty callback for the "Edit" button. This callback plays a crucial role in selecting the specific to-do item you want to update. To achieve this, we need a few things in place:
- Selected To-Do State: We require a state to hold the selected to-do item. This state will contain both the to-do data and the unique ID of the Firestore document associated with it.
- Current To-Do Value: To ensure a smooth update experience, we also need the current value of the to-do item to be displayed inside the input field. This way, you can easily make changes to it.
Let's define the onEdit function that handles these aspects:
// App.jsx
const [todoValue, setTodoValue] = useState("");
const [isEditing, setIsEditing] = useState(false);
const [selectedTodo, setSelectedTodo] = useState(null);
const onEdit = (item) => {
setIsEditing(true);
setTodoValue(item.todo);
setSelectedTodo(item);
};
These states and functions are situated at the parent level of components. We pass them into the TodoList component, where they come into play when you click the "Edit" button for a specific to-do item. This allows you to update the to-do item with ease. Now, let's see how this affects the code for displaying the to-do list:
Updated TodoList.jsx
import React, { useState } from "react";
import { db, doc, onSnapshot, collection, query } from "../firebase";
const TodoList = (props) => {
const { onEdit, onDelete } = props;
const [todos, setTodos] = useState([]);
useEffect(() => {
// this remains same as before
// Fetch data from Firestore and update 'todos' state
// ...
}, []);
return (
<div className="list">
{todos.map((item) => (
<div key={item.docId} className="todo-item">
{item.todo}
<div>
<button onClick={() => onEdit(item)}>Edit</button>
<button onClick={() => onDelete(item)}>Delete</button>
</div>
</div>
))}
</div>
);
};
export default TodoList;
With a clear grasp of how the update functionality will work, we're ready to begin the actual implementation.
Step 1: Import Dependencies
Ensure you have the necessary Firebase and React dependencies imported at the beginning of your UpdateTodo.jsx file:
import React from "react";
import { db, doc, updateDoc } from "../firebase";
Step 2: Define the UpdateTodo Component
Create a functional component called UpdateTodo that receives certain props necessary for updating a to-do item:
const UpdateTodo = (props) => {
const { todoValue, setTodoValue, selectedTodo, setIsEditing } = props;
// ...
}
- todoValue: The current value of the to-do item.
- setTodoValue: A function to update the to-do item's value.
- selectedTodo: The selected to-do item that you want to update.
Step 3: Handle Input Changes
Define a function handleOnChange that captures changes in the input field and updates the todoValue state accordingly:
const handleOnChange = (e) => setTodoValue(e.target.value);
Step 4: Handle Update
Define an onUpdate function that handles the updating process when the form is submitted:
const onUpdate = async (e) => {
e.preventDefault();
try {
const docId = selectedTodo.docId;
const docRef = doc(db, "todos", docId);
await updateDoc(docRef, {
todo: todoValue,
});
setTodoValue("");
// Additional code needed here to handle updating state for editing
setIsEditing(false);
} catch (err) {
console.log("error", err);
}
};
- e.preventDefault(): This line of code prevents the default form submission behavior, ensuring that the form does not reload the page when submitted.
- docId: Here, we obtain the unique ID of the selected to-do item. This ID is essential to identify which specific to-do item we want to update.
- docRef: We create a reference to the Firestore document we intend to update. In this case, it points to the "todos" collection and the specific document using the docId.
- updateDoc: The updateDoc function is provided by Firebase and is used to modify an existing document in Firestore. In our case, we're using it to update the selected to-do item with the new todoValue. Firebase operates on key-value pairs for data, making it easy to update specific fields within a document. You can extend this functionality to update multiple fields simultaneously or add more data as needed.
Step 5: Render the Update Form
Render a form with an input field and an "Update" button. This form allows users to input the updated to-do item and trigger the update process when submitted:
return (
<form className="form" onSubmit={onUpdate}>
<input
type="text"
placeholder="Add Todo"
value={todoValue}
onChange={handleOnChange}
/>
<button type="submit">Update</button>
</form>
);
So, with these components in place, here's the complete code for updating a to-do item to Firestore using Firebase v9 and React.
// UpdateTodo.jsx
import React from "react";
import { db, doc, updateDoc } from "../firebase";
const UpdateTodo = (props) => {
const {todoValue, setTodoValue, selectedTodo } = props;
const handleOnChange = (e) => setTodoValue(e.target.value);
const onUpdate = async (e) => {
e.preventDefault();
try {
const docId = selectedTodo.docId;
const docRef = doc(db, "todos", docId);
await updateDoc(docRef, {
todo: todoValue,
});
setTodoValue("");
setIsEditing(false);
} catch (err) {
console.log("error", err);
}
};
return (
<form className="form" onSubmit={onUpdate}>
<input
type="text"
placeholder="Add Todo"
value={todoValue}
onChange={handleOnChange}
/>
<button type="submit">Update</button>
</form>
);
};
export default UpdateTodo;
Deleting data from the Firestore
The delete process works a bit similar to the update process, where we need to know which todo-item we want to delete, and in order to know that, we have to go back to our TodoList.jsx component where we are rendering our todos. Inside the todo-list we define another function, just like we did for updating todos, called onDelete, that will receive the todo we clicked on or want to delete.
<div className="list">
{todos.map((item) => (
<div key={item.docId} className="todo-item">
{item.todo}
<div>
<button onClick={() => onEdit(item)}>Edit</button>
<button onClick={() => onDelete(item)}>Delete</button>
</div>
</div>
))}
</div>
As for deleting a todo, we just need a delete function that we can create inside the TodoList.jsx. So keeping this in mind, we will update the todoList component.
Step 1: Import Dependencies
We will update the imports from the firebase.js file and import another function called deleteDoc.
import { db, doc, onSnapshot, collection, query, deleteDoc } from "../firebase";
Step 2: Define the onDelete Function
const onDelete = async (todo) => {
const docId = todo?.docId;
if (!docId) return;
try {
await deleteDoc(doc(db, "todos", docId));
console.log("todo deleted successfully");
} catch (err) {
console.log("error in deleting todo", err);
}
};
-
Function Argument: The function takes one argument, todo, which represents the to-do item to be deleted. This argument is an object containing information about the to-do item, including its unique docId.
-
Document ID Extraction: Inside the function, we extract the docId from the todo object using const docId = todo.docId
-
Null Check: We perform a null check to ensure that the docId is not null or undefined. If it is, the function exits early to prevent unintended deletion attempts.
-
doc: doc is a function provided by Firebase that we use to refer to a doc and it takes three arguments, db is your firestore reference, “todos” is the collection name and “docId” is the id of the document you want to refer to.
-
deleteDoc: The deleteDoc function is provided by Firebase and is used to delete a doc from the Firebase. It takes a doc reference, which we want to delete.
-
Deletion Process:
We use a try-catch block to handle potential errors during the deletion process.
The await deleteDoc(...) line is responsible for deleting the Firestore document associated with the given docId. It uses the deleteDoc function provided by Firebase.
We pass three arguments to deleteDoc: the Firestore instance (db), the collection name ("todos"), and the specific docId.
If the deletion is successful, it logs a message to the console indicating that the to-do was deleted successfully.
-
Error Handling: In case an error occurs during the deletion process, the catch block is executed. It logs an error message with the details of the error using console.log("error in deleting todo", err);
This function, onDelete, is responsible for handling the deletion of a to-do item from Firestore. It ensures that the operation is carried out safely and provides error feedback if any issues arise during the deletion process.
After adding all this, the final updated TodoList.jsx component will be
// TodoList.jsx
import { useState, useEffect } from "react";
import { db, doc, onSnapshot, collection, query, deleteDoc } from "../firebase";
const TodosList = (props) => {
const { onEdit } = props;
const [todos, setTodos] = useState([]);
useEffect(() => {
const q = query(collection(db, "todos"));
const unsubscribe = onSnapshot(q, (snapShot) => {
const todosArray = [];
snapShot.forEach((doc) => {
const todo = { ...doc.data(), docId: doc.id };
todosArray.push(todo);
});
setTodos(todosArray);
});
return () => unsubscribe();
}, []);
const onDelete = async (todo) => {
const docId = todo?.docId;
if (!docId) return;
try {
await deleteDoc(doc(db, "todos", docId));
console.log("todo deleted successfully");
} catch (err) {
console.log("error in deleting todo", err);
}
};
return (
<div className="list">
{todos.map((item) => (
<div key={item.docId} className="todo-item">
{item.todo}
<div>
<button onClick={() => onEdit(item)}>Edit</button>
<button onClick={() => onDelete(item)}>Delete</button>
</div>
</div>
))}
</div>
);
};
export default TodosList;
After building all the components, it’s time to import everything into the parent component.
Putting together all the components
// App.jsx
import { useState } from "react";
import "./App.css";
import TodosList from "./components/TodosList";
import AddTodo from "./components/AddTodo";
import UpdateTodo from "./components/UpdateTodo";
function App() {
const [todoValue, setTodoValue] = useState("");
const [isEditing, setIsEditing] = useState(false);
const [selectedTodo, setSelectedTodo] = useState(null);
const onEdit = (item) => {
setIsEditing(true);
setTodoValue(item.todo);
setSelectedTodo(item);
};
return (
<div className="main">
<div className="todos-container">
<h1>Todo App</h1>
<div>
{isEditing ? (
<UpdateTodo
todoValue={todoValue}
setTodoValue={setTodoValue}
selectedTodo={selectedTodo}
setIsEditing={setIsEditing}
/>
) : (
<AddTodo todoValue={todoValue} setTodoValue={setTodoValue} />
)}
<TodosList onEdit={onEdit} />
</div>
</div>
</div>
);
}
export default App;
In this App.jsx code, we use the isEditing state to determine whether we're in edit mode or adding a new todo. Based on this state, we conditionally render either the UpdateTodo component (for editing) or the AddTodo component (for adding new todos). The TodosList component is used to display the list of todos, and the onEdit function is passed down as a prop to enable editing of individual todos.
With this, we've successfully built the CRUD app, and it should operate smoothly.
It's important to mention that while I've showcased a modular approach where operations are organized into separate files, I'll also provide an example of consolidating everything into a single file for your convenience.
Below, you'll find the complete code integrated into a single component for reference:
Combined Code into a Single Component
// CombinedTodoList.jsx
import { useState, useEffect } from "react";
import {
db,
doc,
onSnapshot,
addDoc,
collection,
query,
updateDoc,
deleteDoc,
} from "../firebase";
function CombinedTodoList() {
const [todos, setTodos] = useState([]);
const [todoValue, setTodoValue] = useState("");
const [isEditing, setIsEditing] = useState(false);
const [selectedTodo, setSelectedTodo] = useState(null);
useEffect(() => {
const q = query(collection(db, "todos"));
const unsubscribe = onSnapshot(q, (snapShot) => {
const todosArray = [];
snapShot.forEach((doc) => {
const todo = { ...doc.data(), docId: doc.id };
todosArray.push(todo);
});
setTodos(todosArray);
});
return () => unsubscribe();
}, []);
console.log("todos", todos);
const onSubmit = async (e) => {
e.preventDefault();
try {
const doc = await addDoc(collection(db, "todos"), {
todo: todoValue,
});
console.log("Todo added : ", doc.id);
setTodoValue("");
} catch (err) {
console.log("error in adding todo", err);
}
};
const handleOnChange = (e) => setTodoValue(e.target.value);
const onEdit = (item) => {
setIsEditing(true);
setTodoValue(item.todo);
setSelectedTodo(item);
};
const onUpdate = async (e) => {
e.preventDefault();
try {
const docId = selectedTodo.docId;
const docRef = doc(db, "todos", docId);
await updateDoc(docRef, {
todo: todoValue,
});
setTodoValue("");
setIsEditing(false);
} catch (err) {
console.log("error", err);
}
};
const onDelete = async (todo) => {
const docId = todo.docId;
if (!docId) return;
try {
await deleteDoc(doc(db, "todos", docId));
console.log("todo deleted successfully");
} catch (err) {
console.log("error in deleting todo", err);
}
};
return (
<div className="main">
<div className="todos-container">
<h1>Todo App</h1>
<div>
{isEditing ? (
<form className="form" onSubmit={onUpdate}>
<input
type="text"
placeholder="Add Todo"
value={todoValue}
onChange={handleOnChange}
/>
<button type="submit">Update</button>
</form>
) : (
<form className="form" onSubmit={onSubmit}>
<input
type="text"
placeholder="Add Todo"
value={todoValue}
onChange={handleOnChange}
/>
<button type="submit">Add</button>
</form>
)}
<div className="list">
{todos.map((item) => (
<div key={item.docId} className="todo-item">
{item.todo}
<div>
<button onClick={() => onEdit(item)}>Edit</button>
<button onClick={() => onDelete(item)}>Delete</button>
</div>
</div>
))}
</div>
</div>
</div>
</div>
);
}
export default CombinedTodoList;
Conclusion
In this tutorial, we've explored the process of performing CRUD operations in React with Firebase v9. By now, you should have a clear understanding of how to execute crud operations on Firestore using the latest Firebase library.