How to Implement Firebase Authentication in Your React App for Seamless User Authentication
Jul 2023 · 21 min
Step-by-Step Tutorial on Setting up Firebase, Implementing Authentication, and Creating Private/Public Layouts with Protected Routes in React.
.png&w=3840&q=75)
Overview
In this comprehensive guide, we will dive into integrating React with Firebase for robust user authentication, along with the implementation of protected and restricted routes. Whether you're a seasoned developer or just getting started, this tutorial will walk you through the process step by step.
With the power of React and Firebase, I’ll show you how to:
- Set up user authentication to secure your app.
- Create protected routes to restrict access to certain parts of your application.
- Implement restricted routes for authenticated users only.
- Provide a seamless and secure user experience.
By the end of this tutorial, you'll have a solid understanding of how to enhance your React application's security and user access control with Firebase authentication. Let's dive in and get started on this exciting journey!
React Project Setup
First of all, we will create a react project using Vite, as it has a fast hot module reload that helps us in development by compiling our project very fast.
To create an app using Vite, run this command
yarn create vite
// or with npm
npm create vite@latest
It will ask the details in steps as following
- Project name → for that we will name this project react-firebase-authentication-guide

- Project template → for template/framework we will choose React
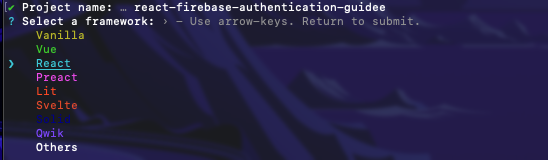
- Project language → and finally we will select javascript as the language for this project

- After creating the project, the final steps are to go into the folder by using cd command
- After that, install the dependencies using yarn or npm install

After this, we will install Firebase using the following command. We are using Firebase v8 for this purpose.
yarn add firebase@8.8.1
Along with Firebase, we also need to install another dependency called react-router-dom for handling route navigation between public and private routes. You can install it by running the following command:
yarn add react-router-dom
And finally, we will start our project using the following command. Make sure you run this command in your project directory.
yarn dev
// or
npm run dev
It will start our project at port http://127.0.0.1:5173/
If you want to use localhot:3000, then you can update the vite.config.js file like this.
vite.config.js
import { defineConfig } from "vite";
import react from "@vitejs/plugin-react";
// https://vitejs.dev/config/
export default defineConfig({
plugins: [react()],
server: {
port: 3000,
},
});
After setting up our react project, now it’s time to create our firebase project.
Firebase Project setup
To begin, you need to access the Firebase console by visiting the following URL: https://console.firebase.google.com. Once you're there, follow these steps:
- Click on "Add Project" to create a new project.
- Provide a name for your project.
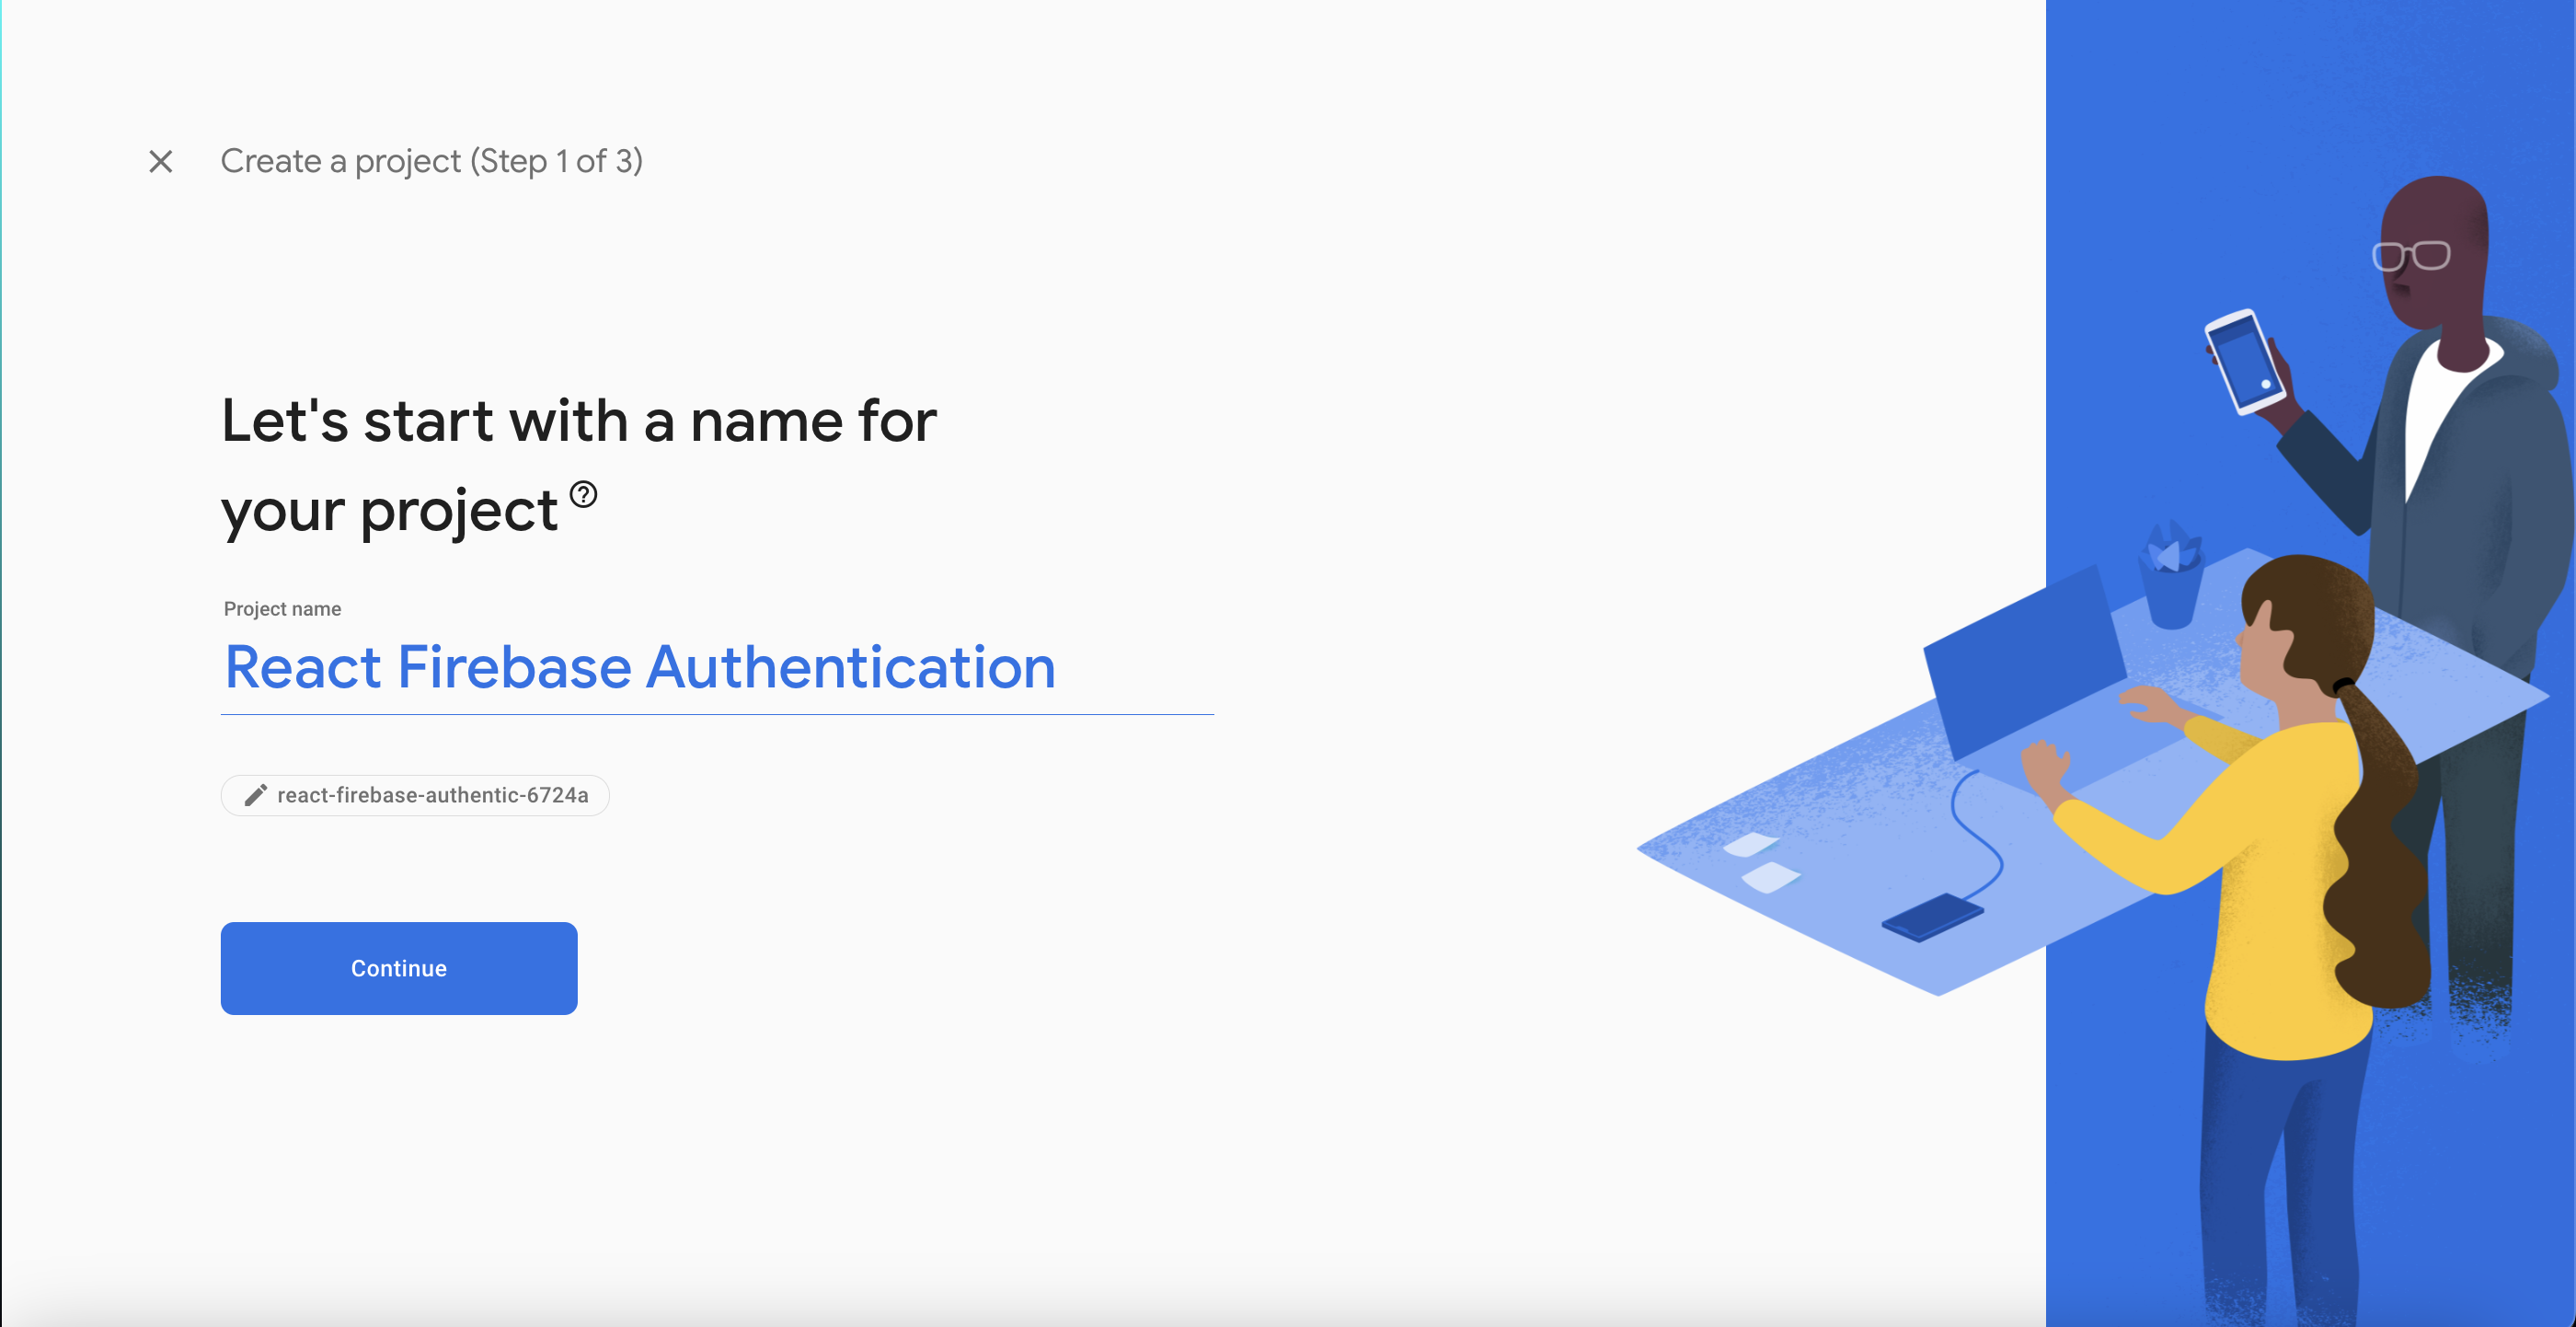
Afterward, ensure that analytics is turned off by selecting the corresponding option. Then, click on "Create Project" and patiently wait for a moment. Once the project is successfully created, you will be redirected to the Firebase project console.

Next, navigate to the project settings by locating and clicking on the settings gear icon located in the top left section, as illustrated below.
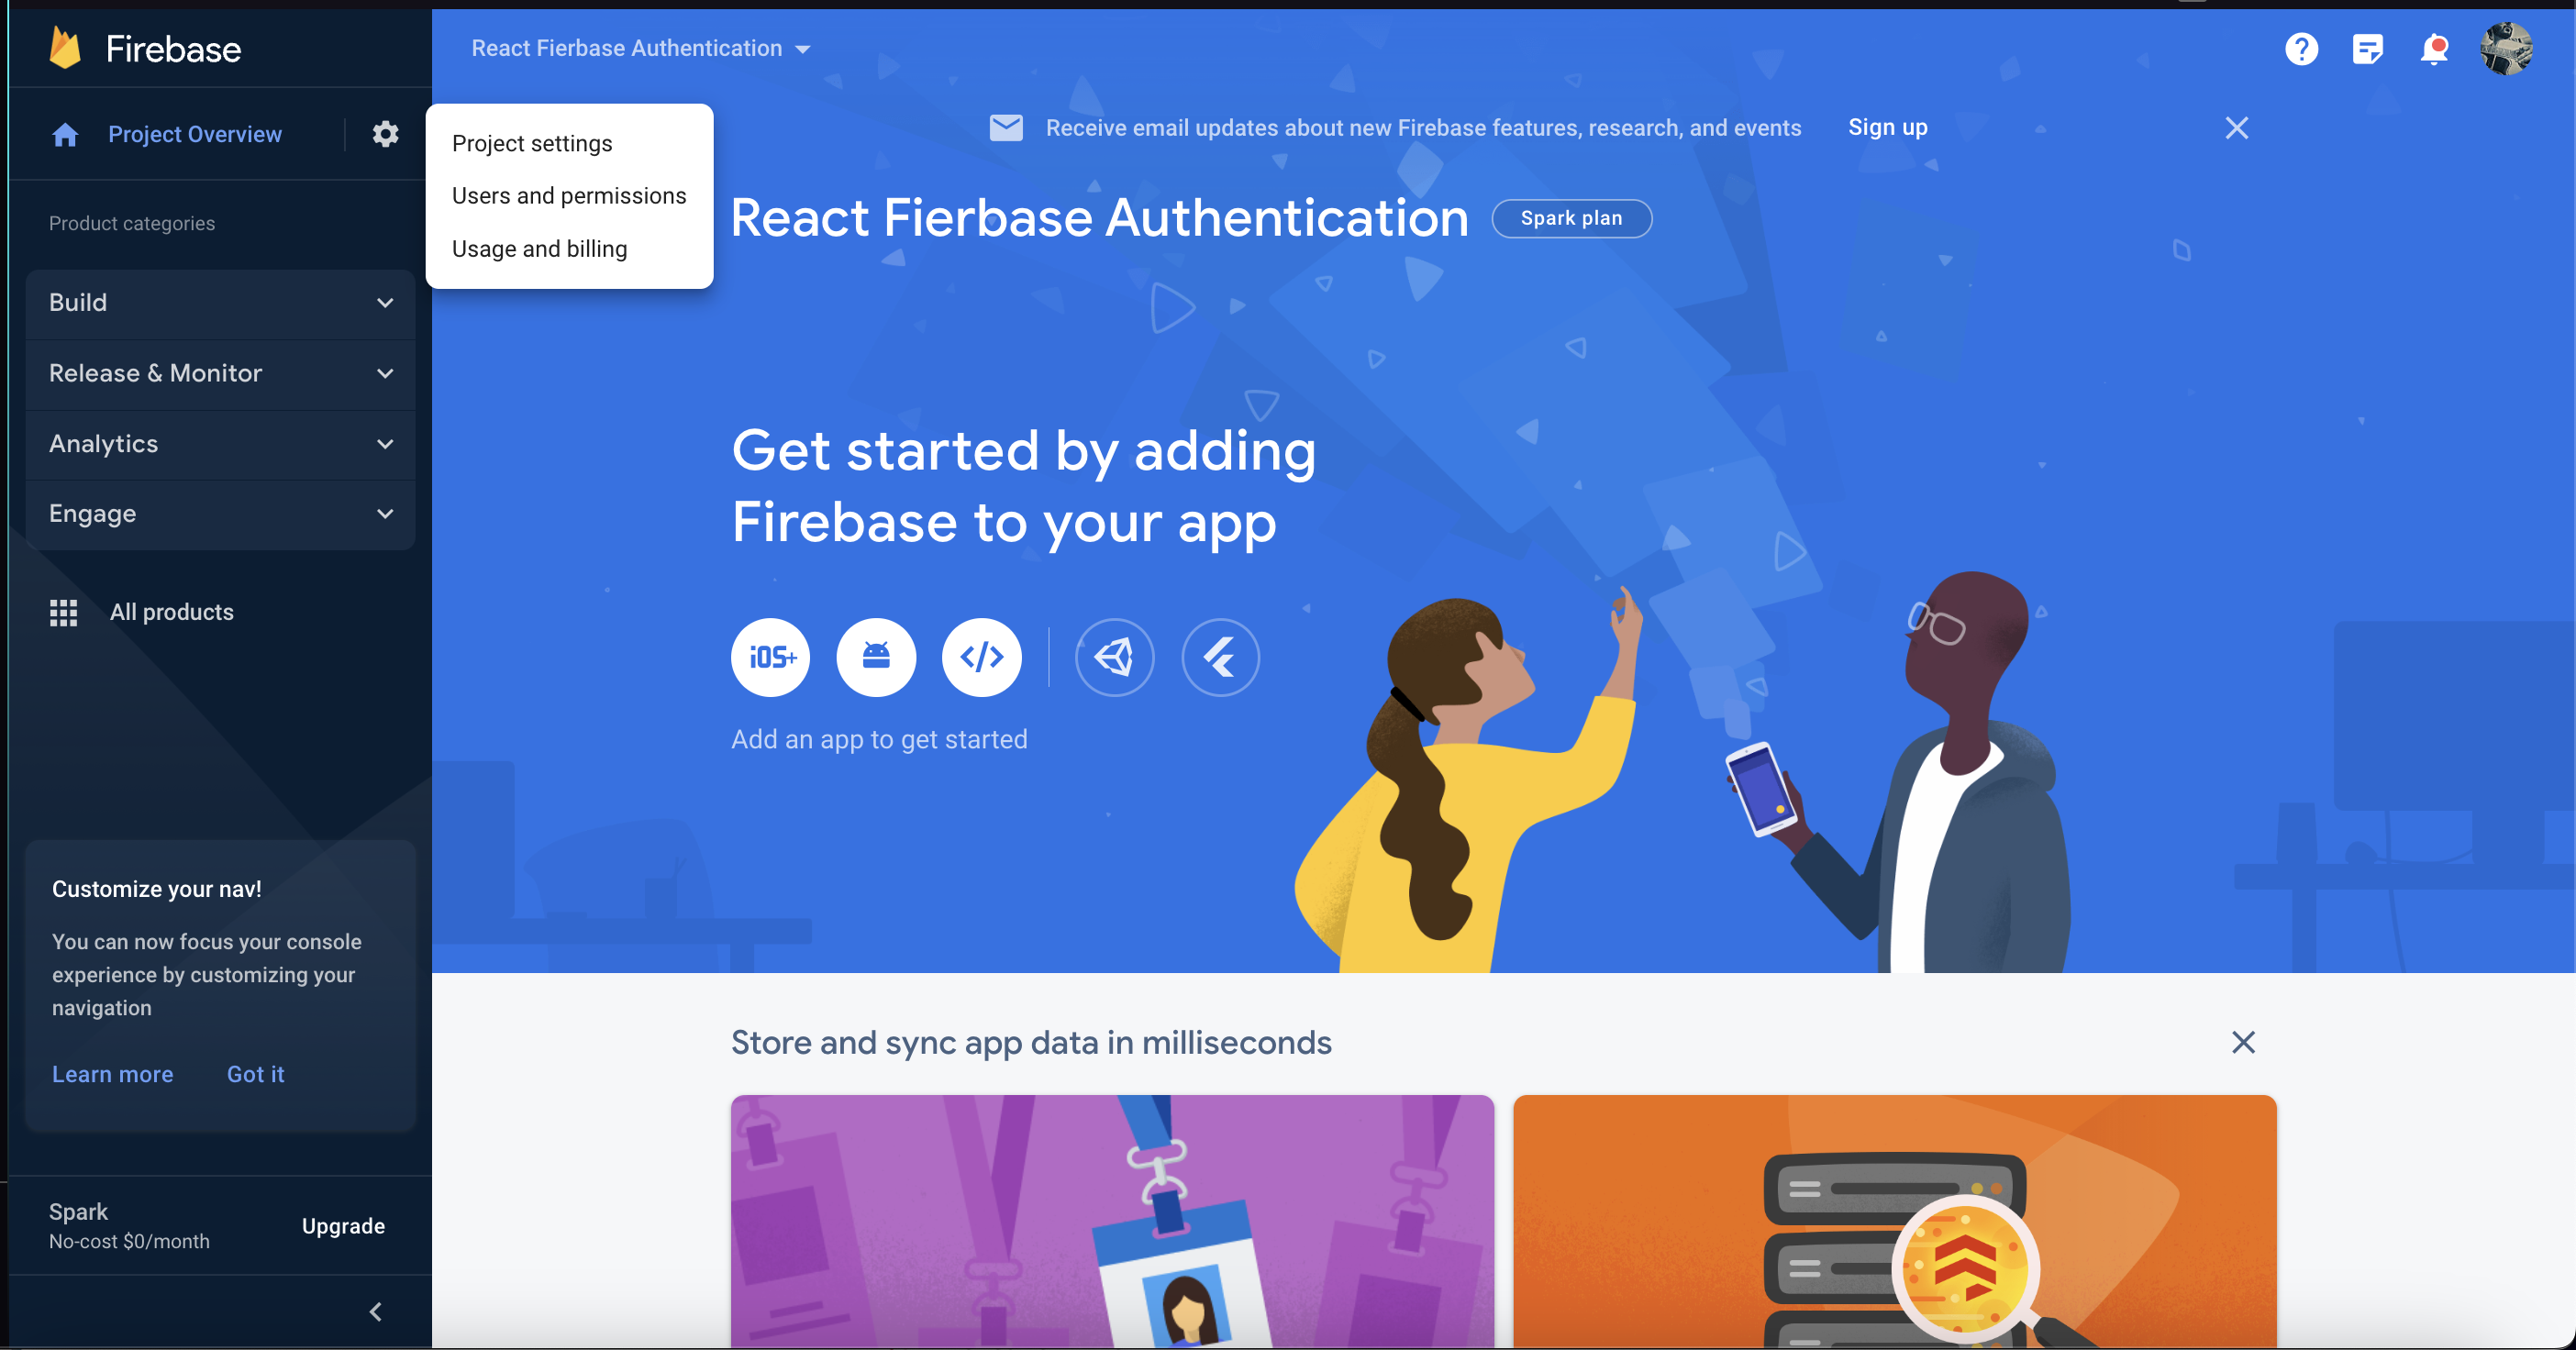
Once you have accessed the project settings, you will encounter a screen resembling the following. Your next step is to add a web app using Firebase. To proceed, click on the icon resembling brackets, which represents the option for adding a web app.
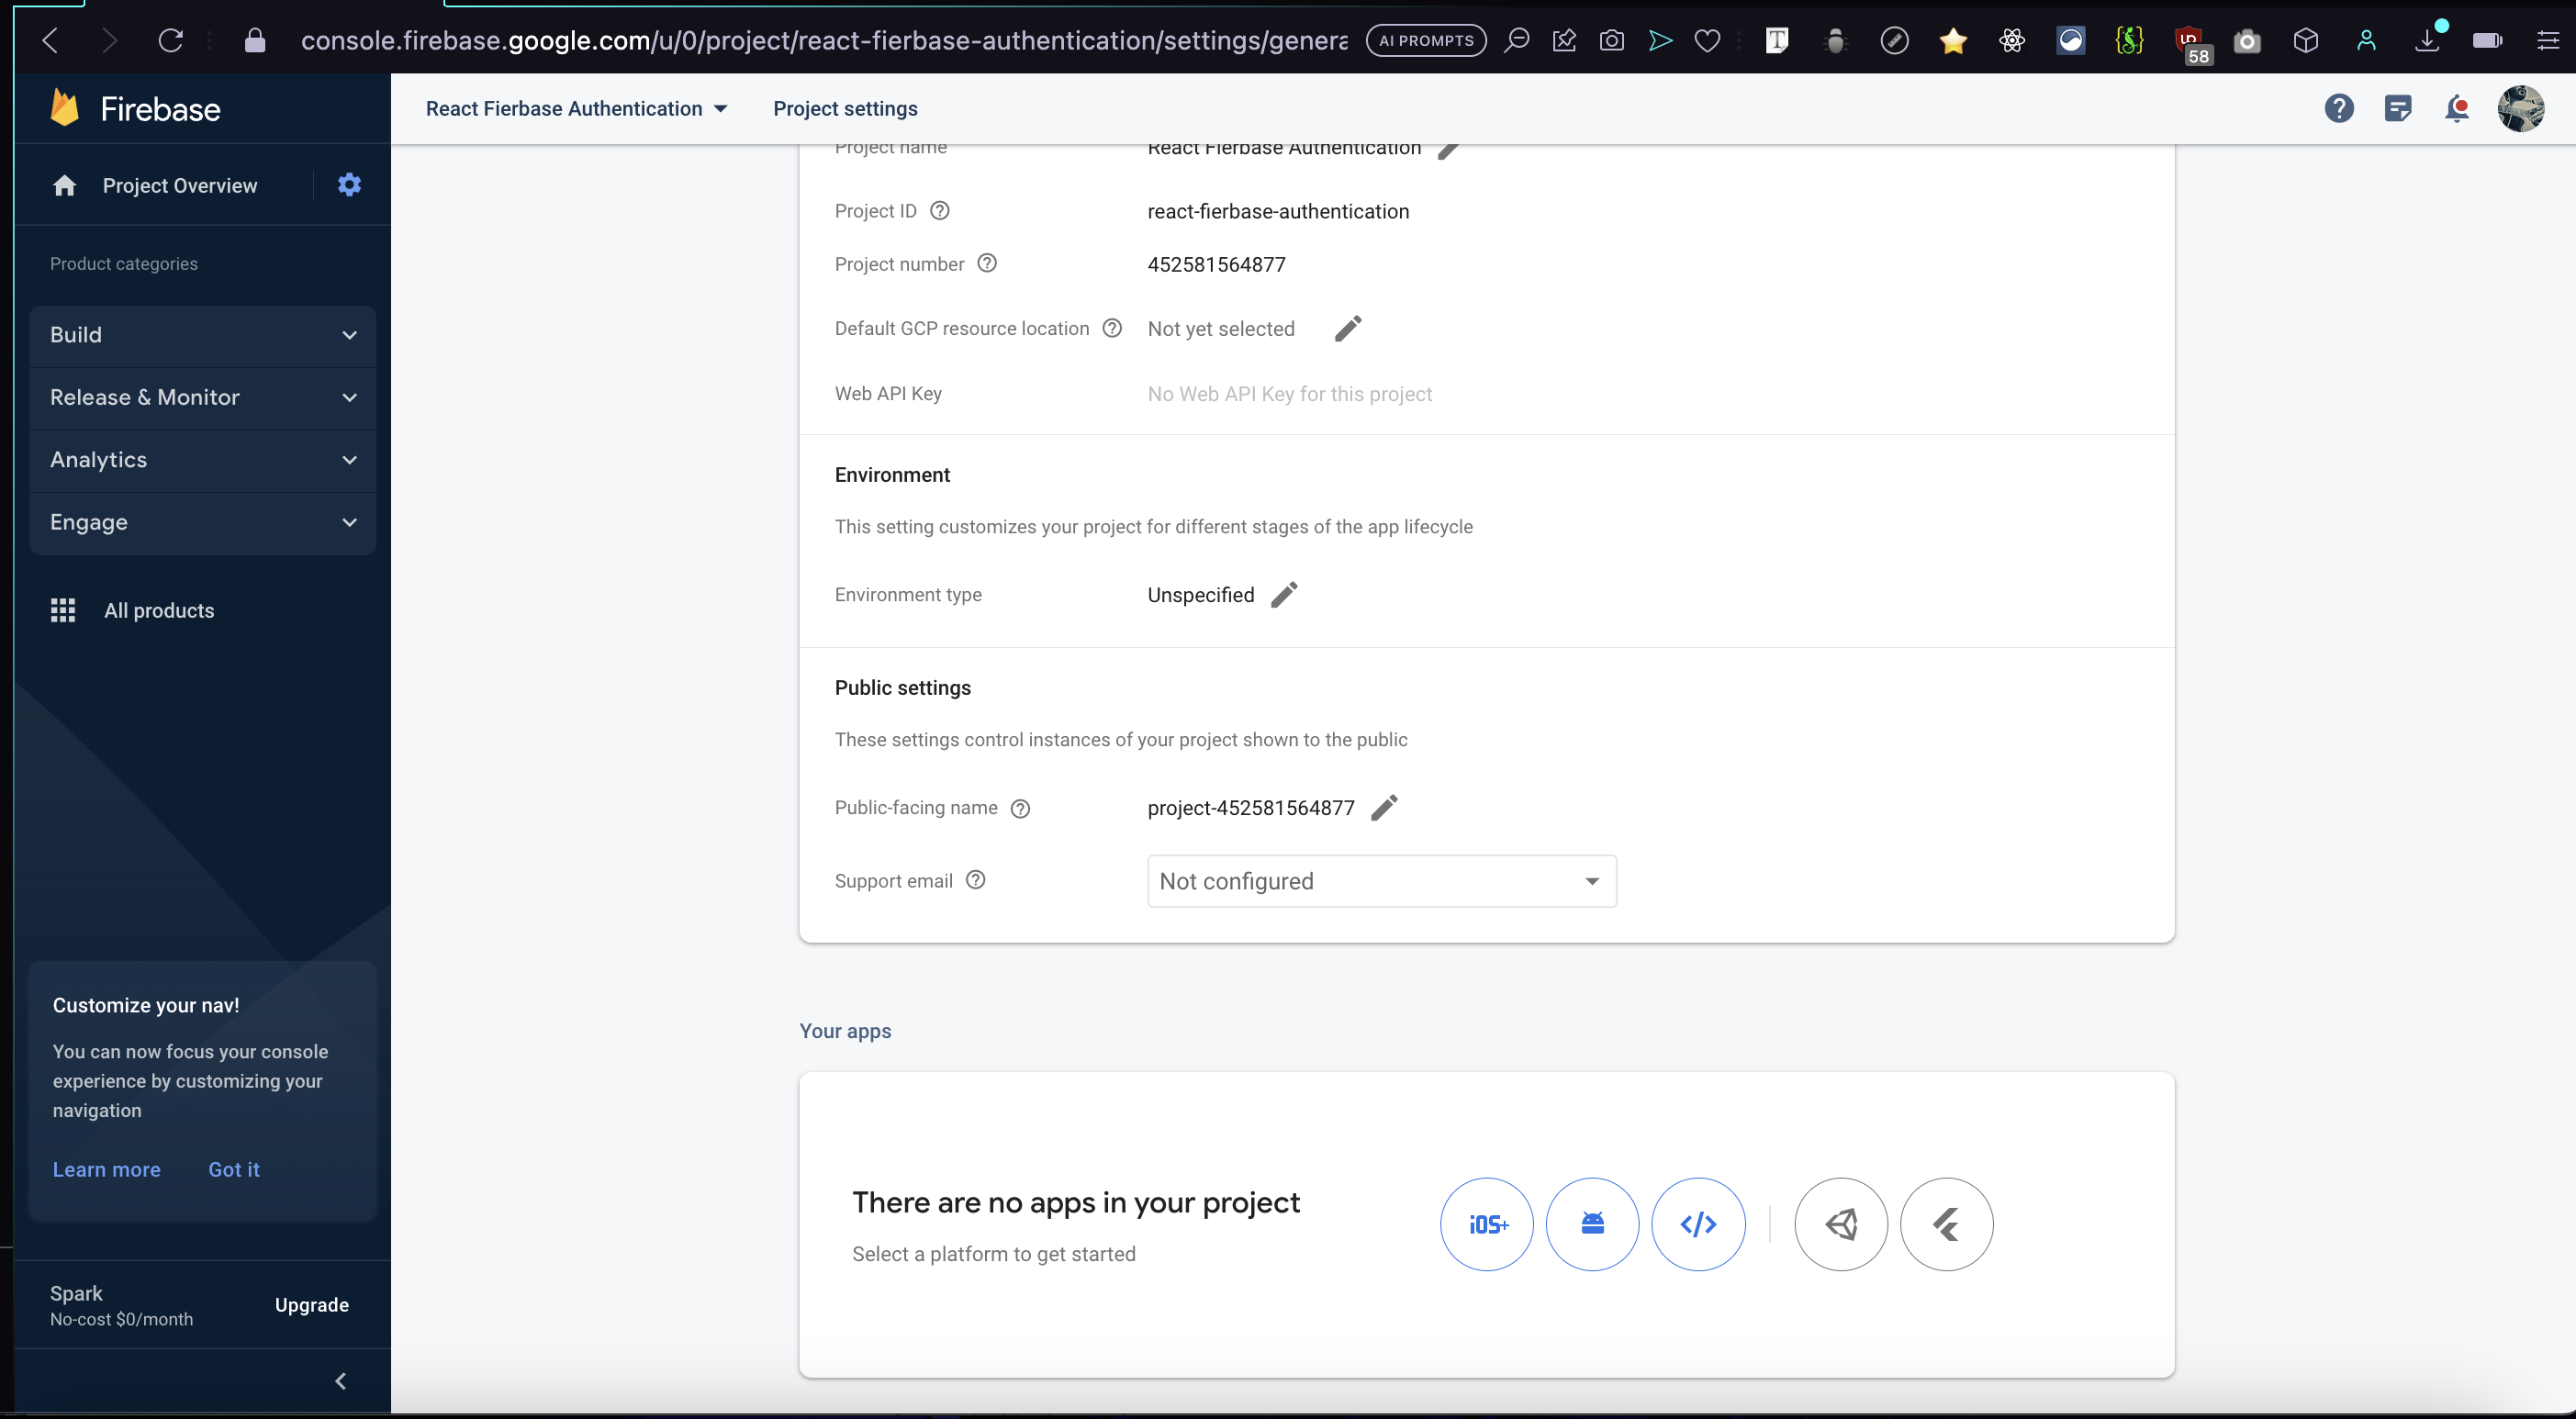
After selecting the web app option, provide a suitable name for your web app in the designated field, as shown below. Once you've named your web app, click on "Register App" to proceed.
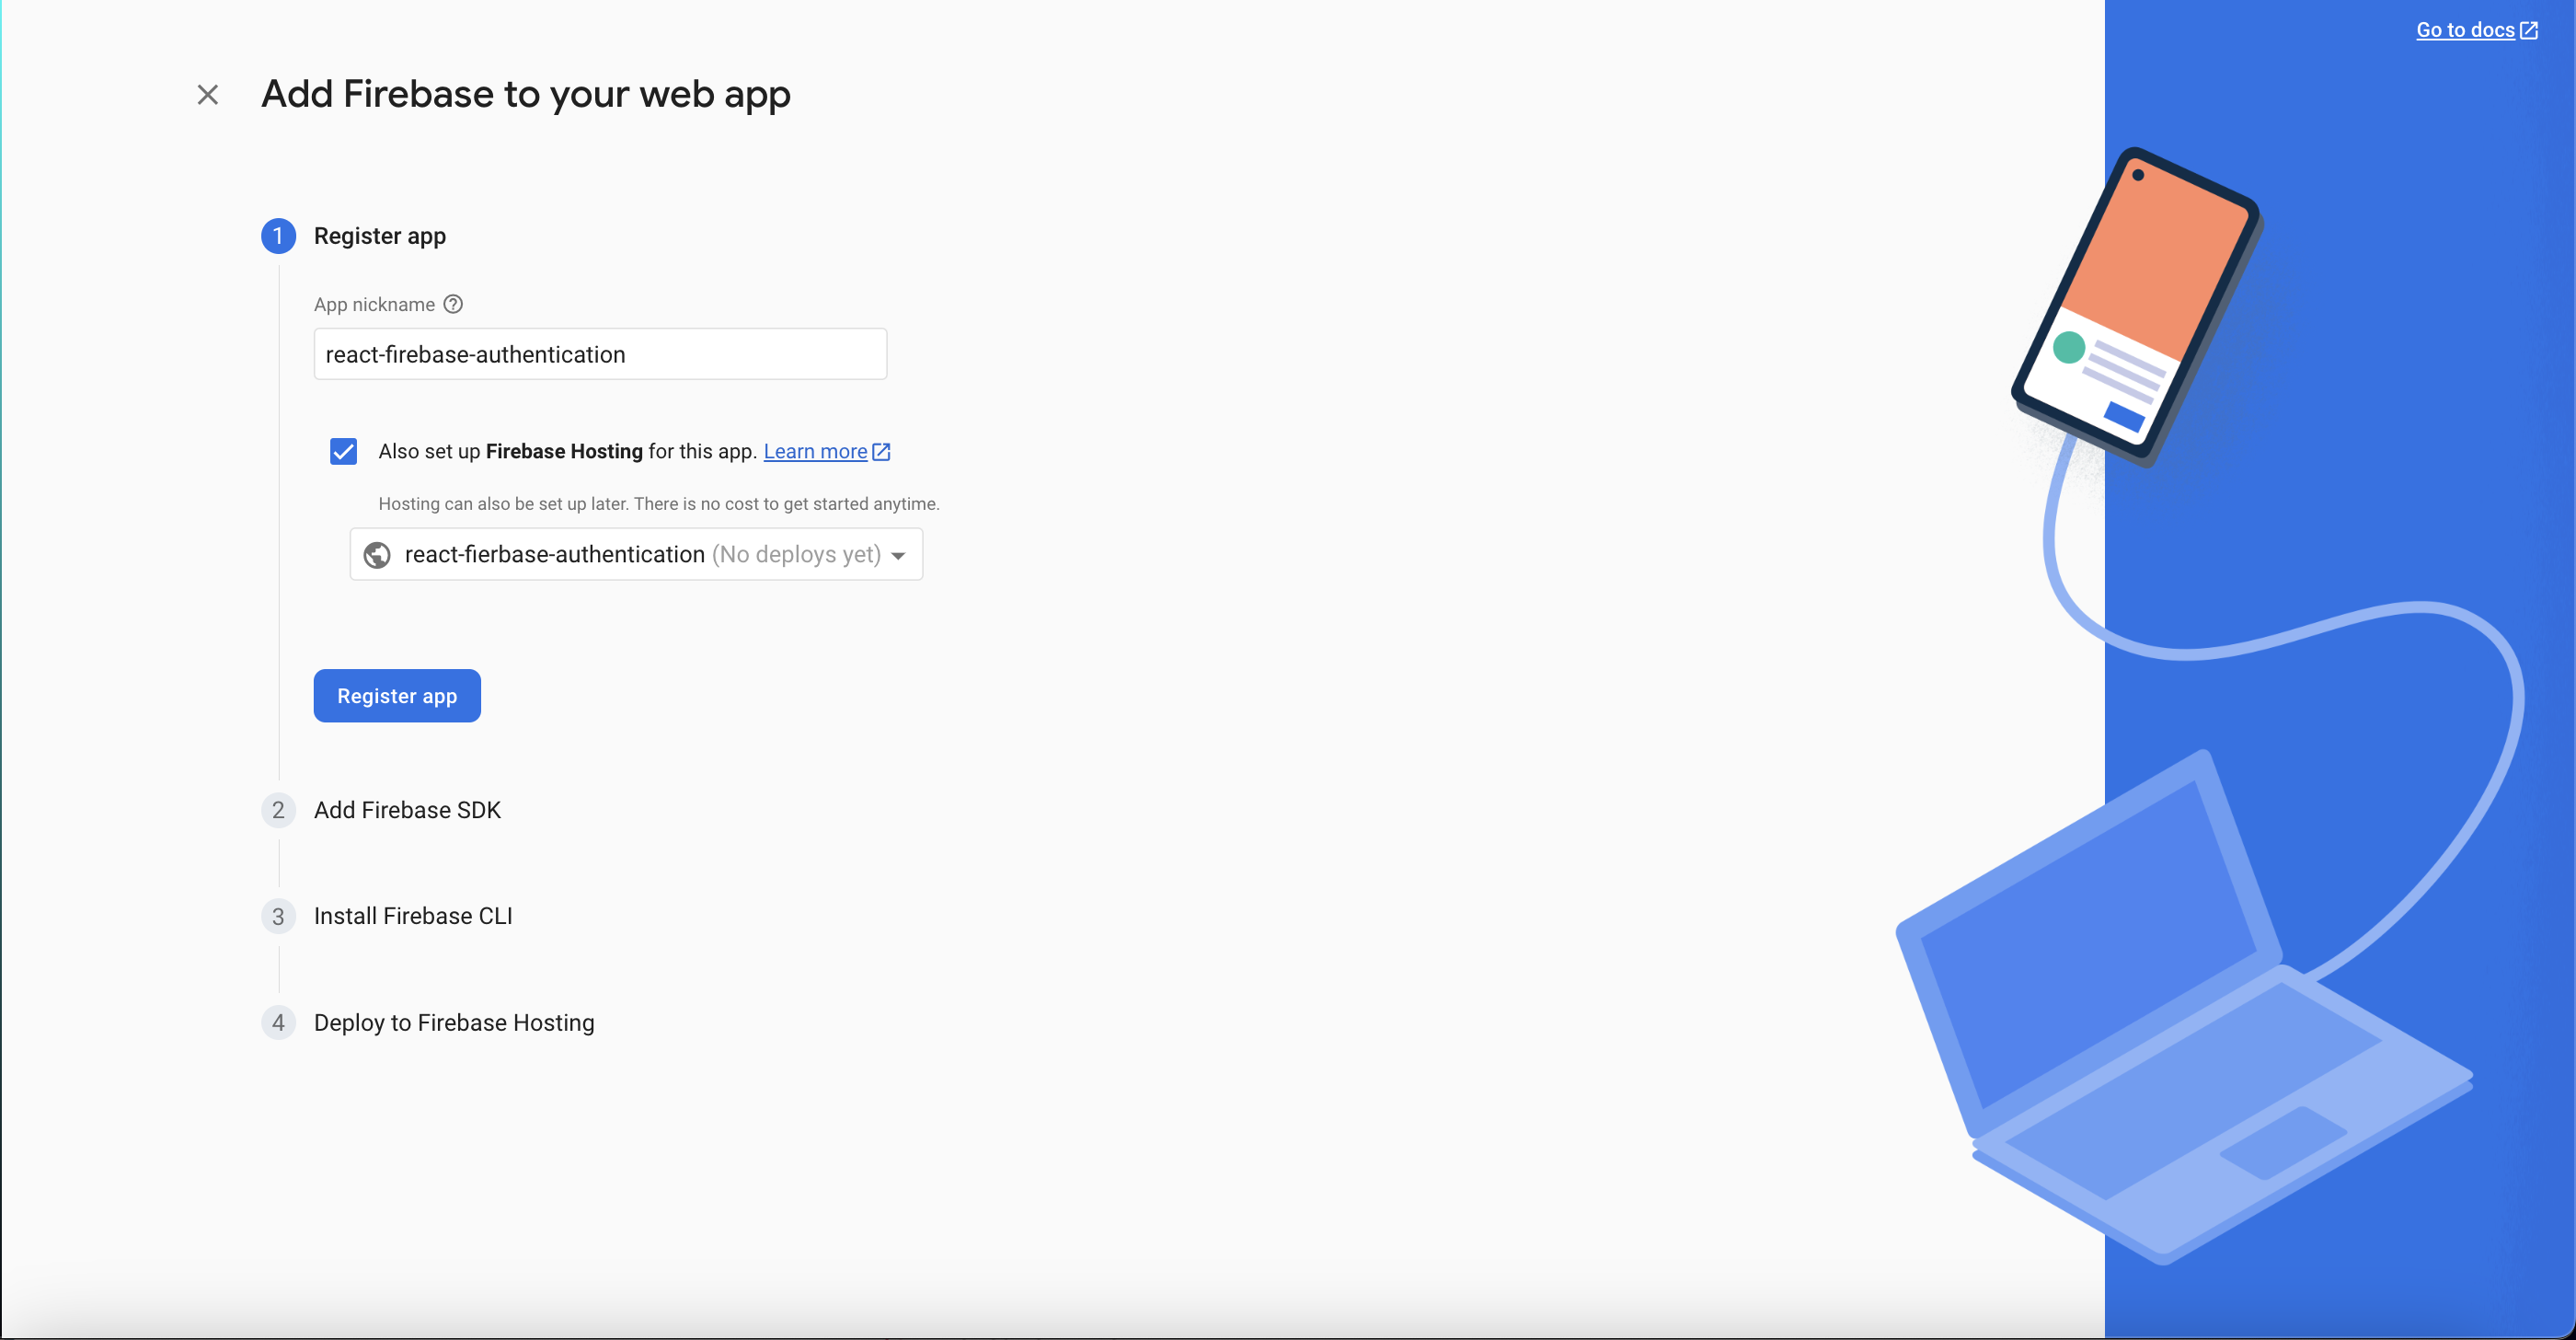
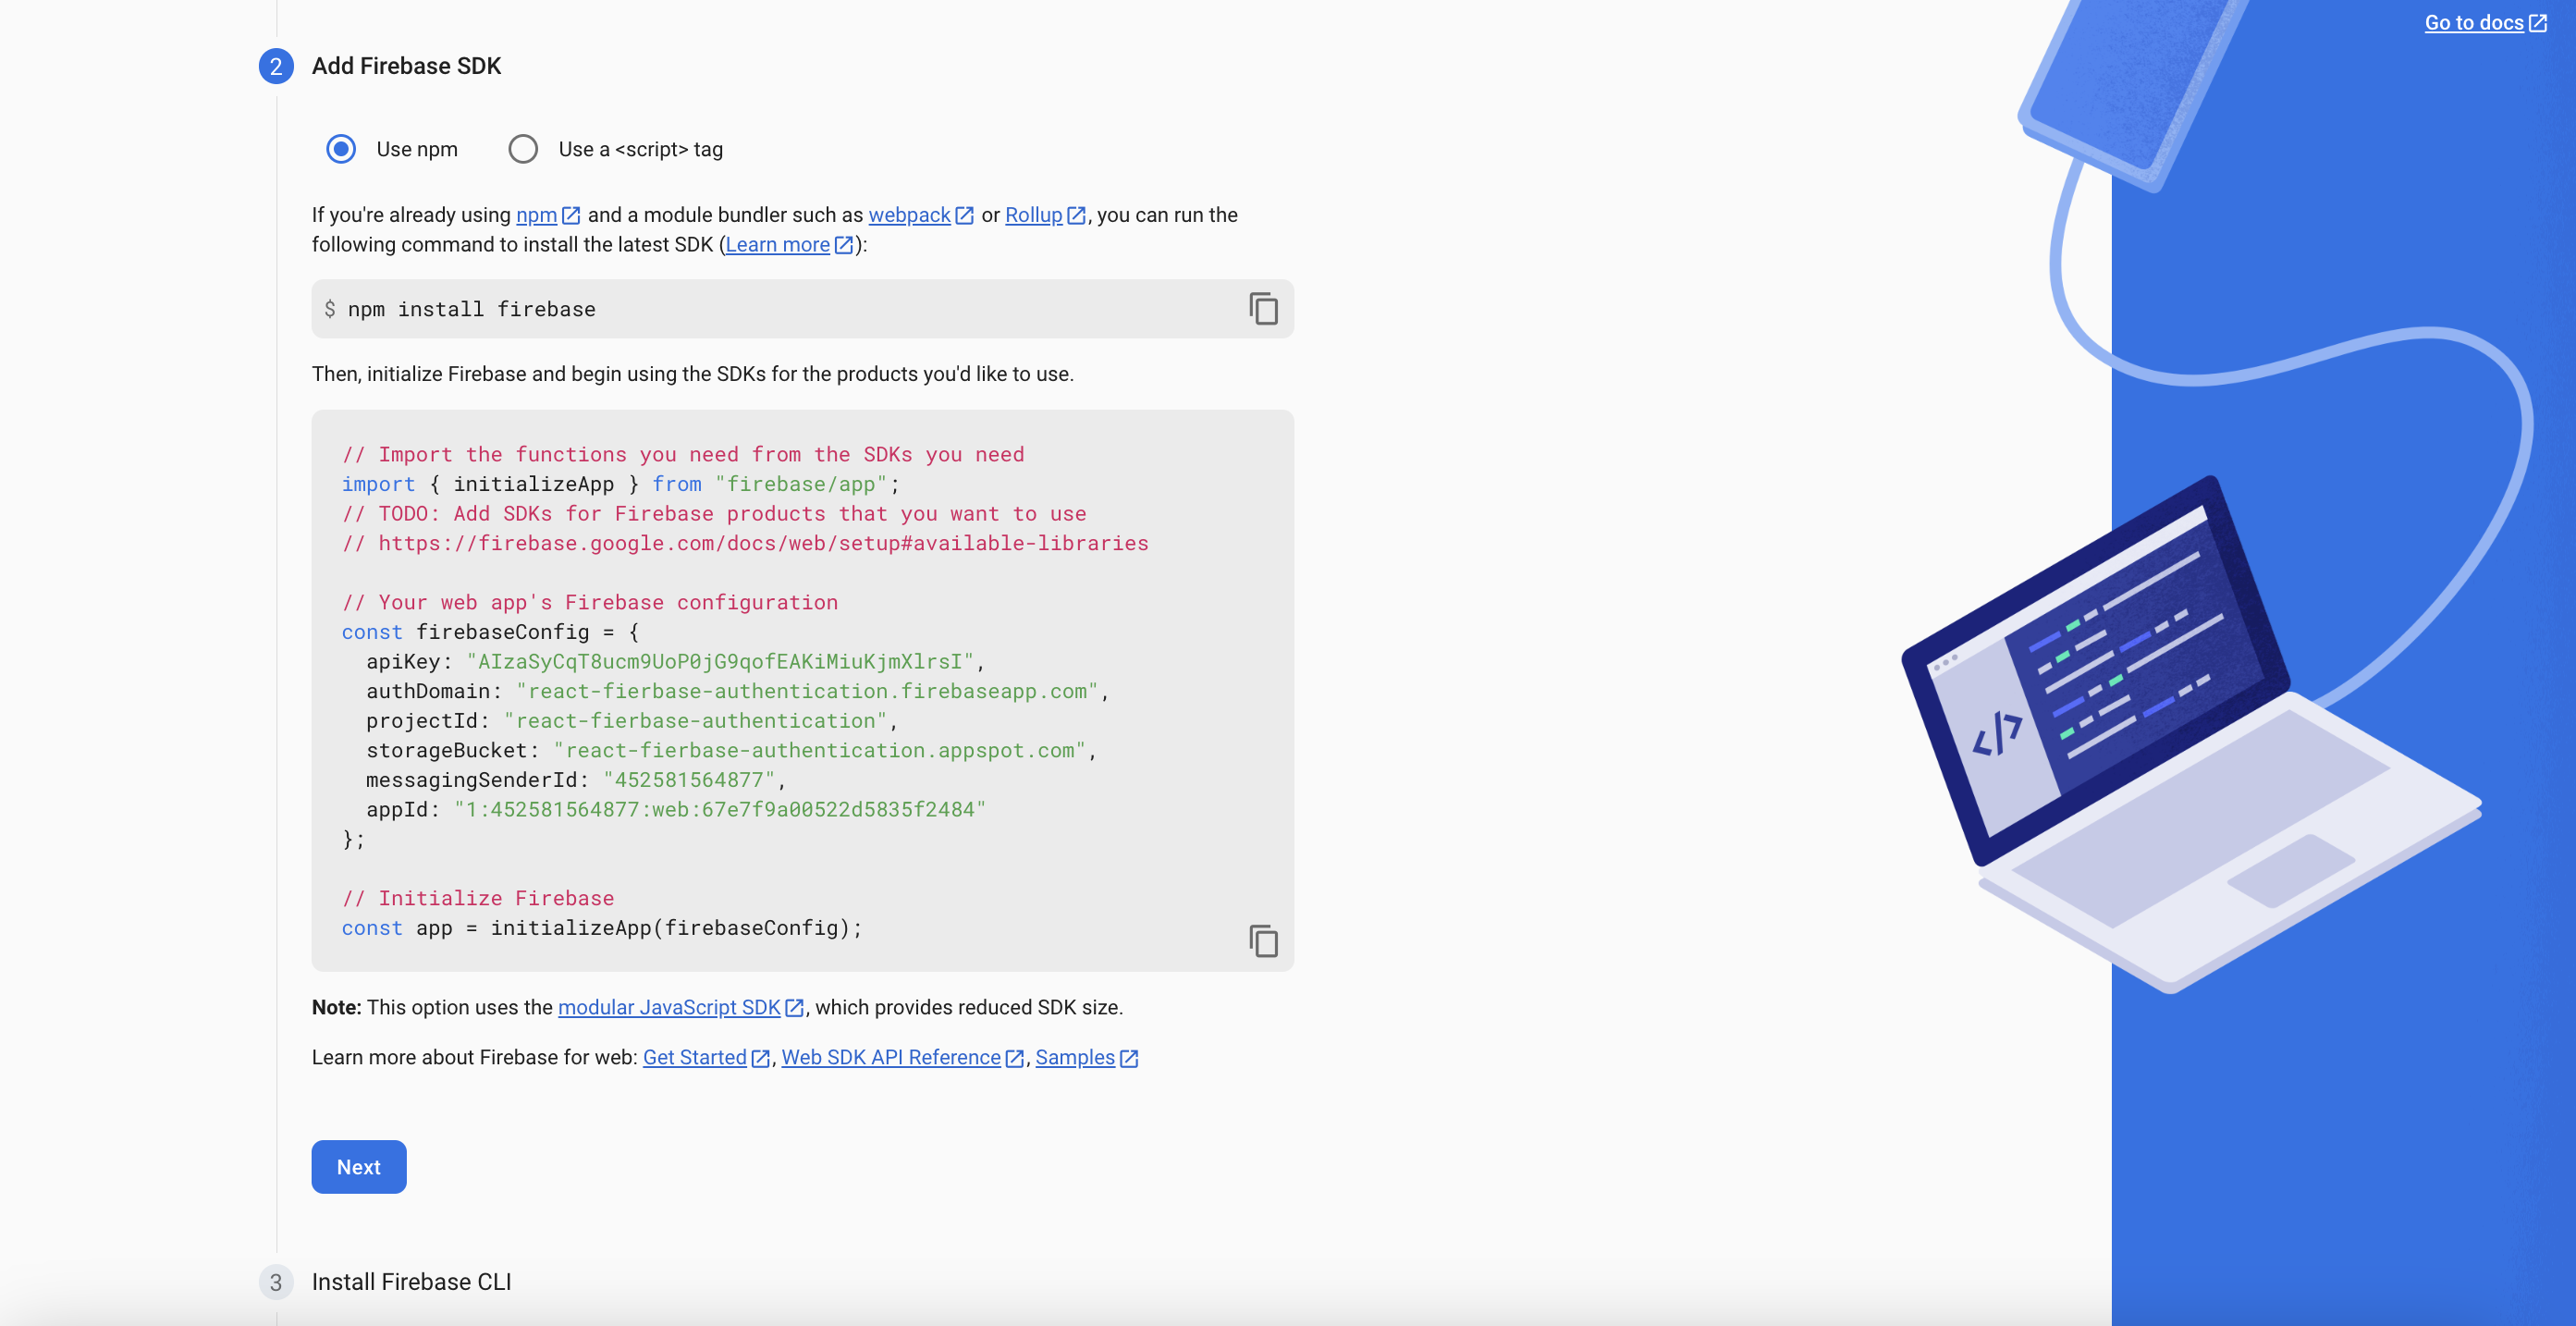
Upon clicking "Register App," you will be presented with the Firebase installation guide. However, since you have already installed Firebase, you can skip this step. Instead, you should focus on copying the Firebase configuration settings, as demonstrated below. Once you have copied the configuration settings, click on "Next" to proceed.
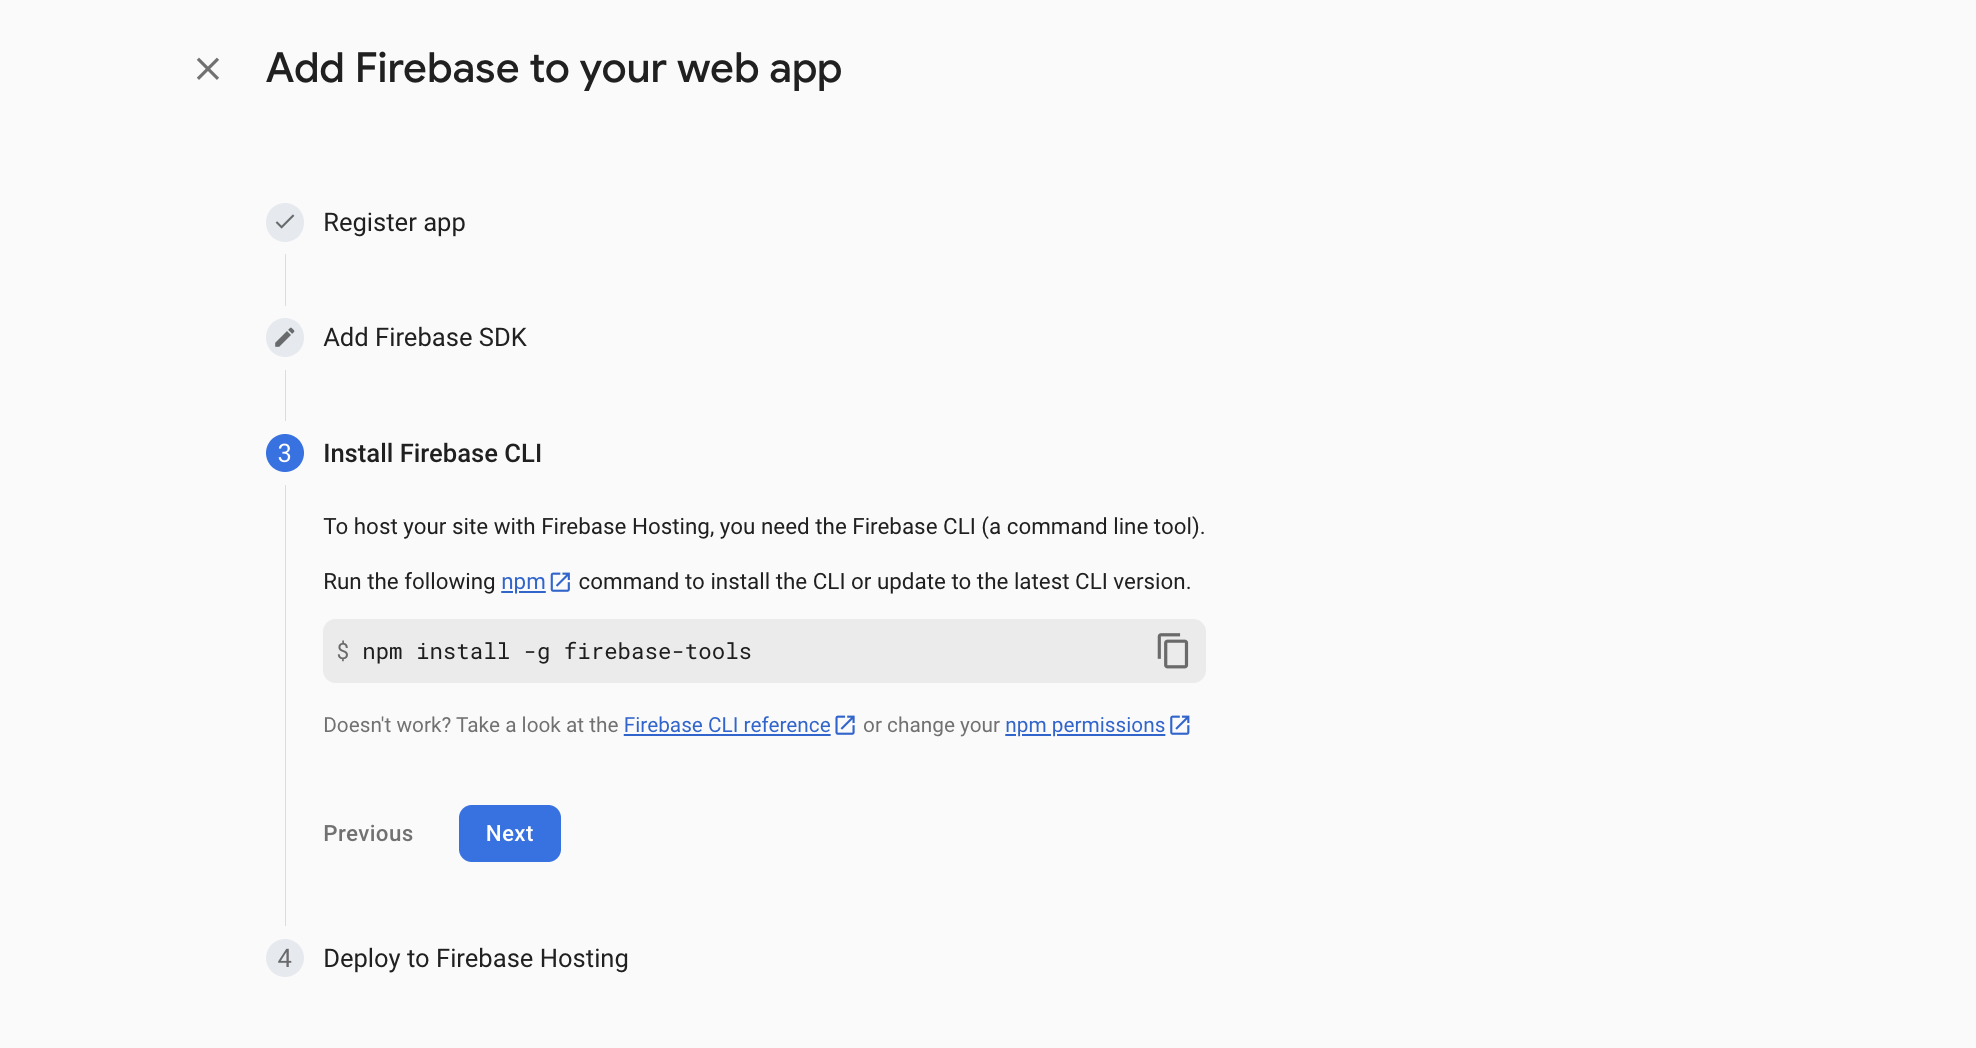
After clicking "Next," you will have the option to install Firebase tools if you haven't done so already. You can proceed with this installation by following the provided instructions. Once you have completed the installation, click on "Next" and then click on "Go to the console" to proceed.
Excellent! With this, your web app setup with Firebase is complete. Now, let's move on to enabling authentication for your project. Follow these steps:
- Click on the "Build" tab.
- In the left sidebar, locate and click on "Authentication."
On the Authentication tab, you will find a "Get Started" button. Click on it to proceed.

After clicking on the "Get Started" button, you will be presented with various authentication options. Select the "Email and Password" option from the available choices.
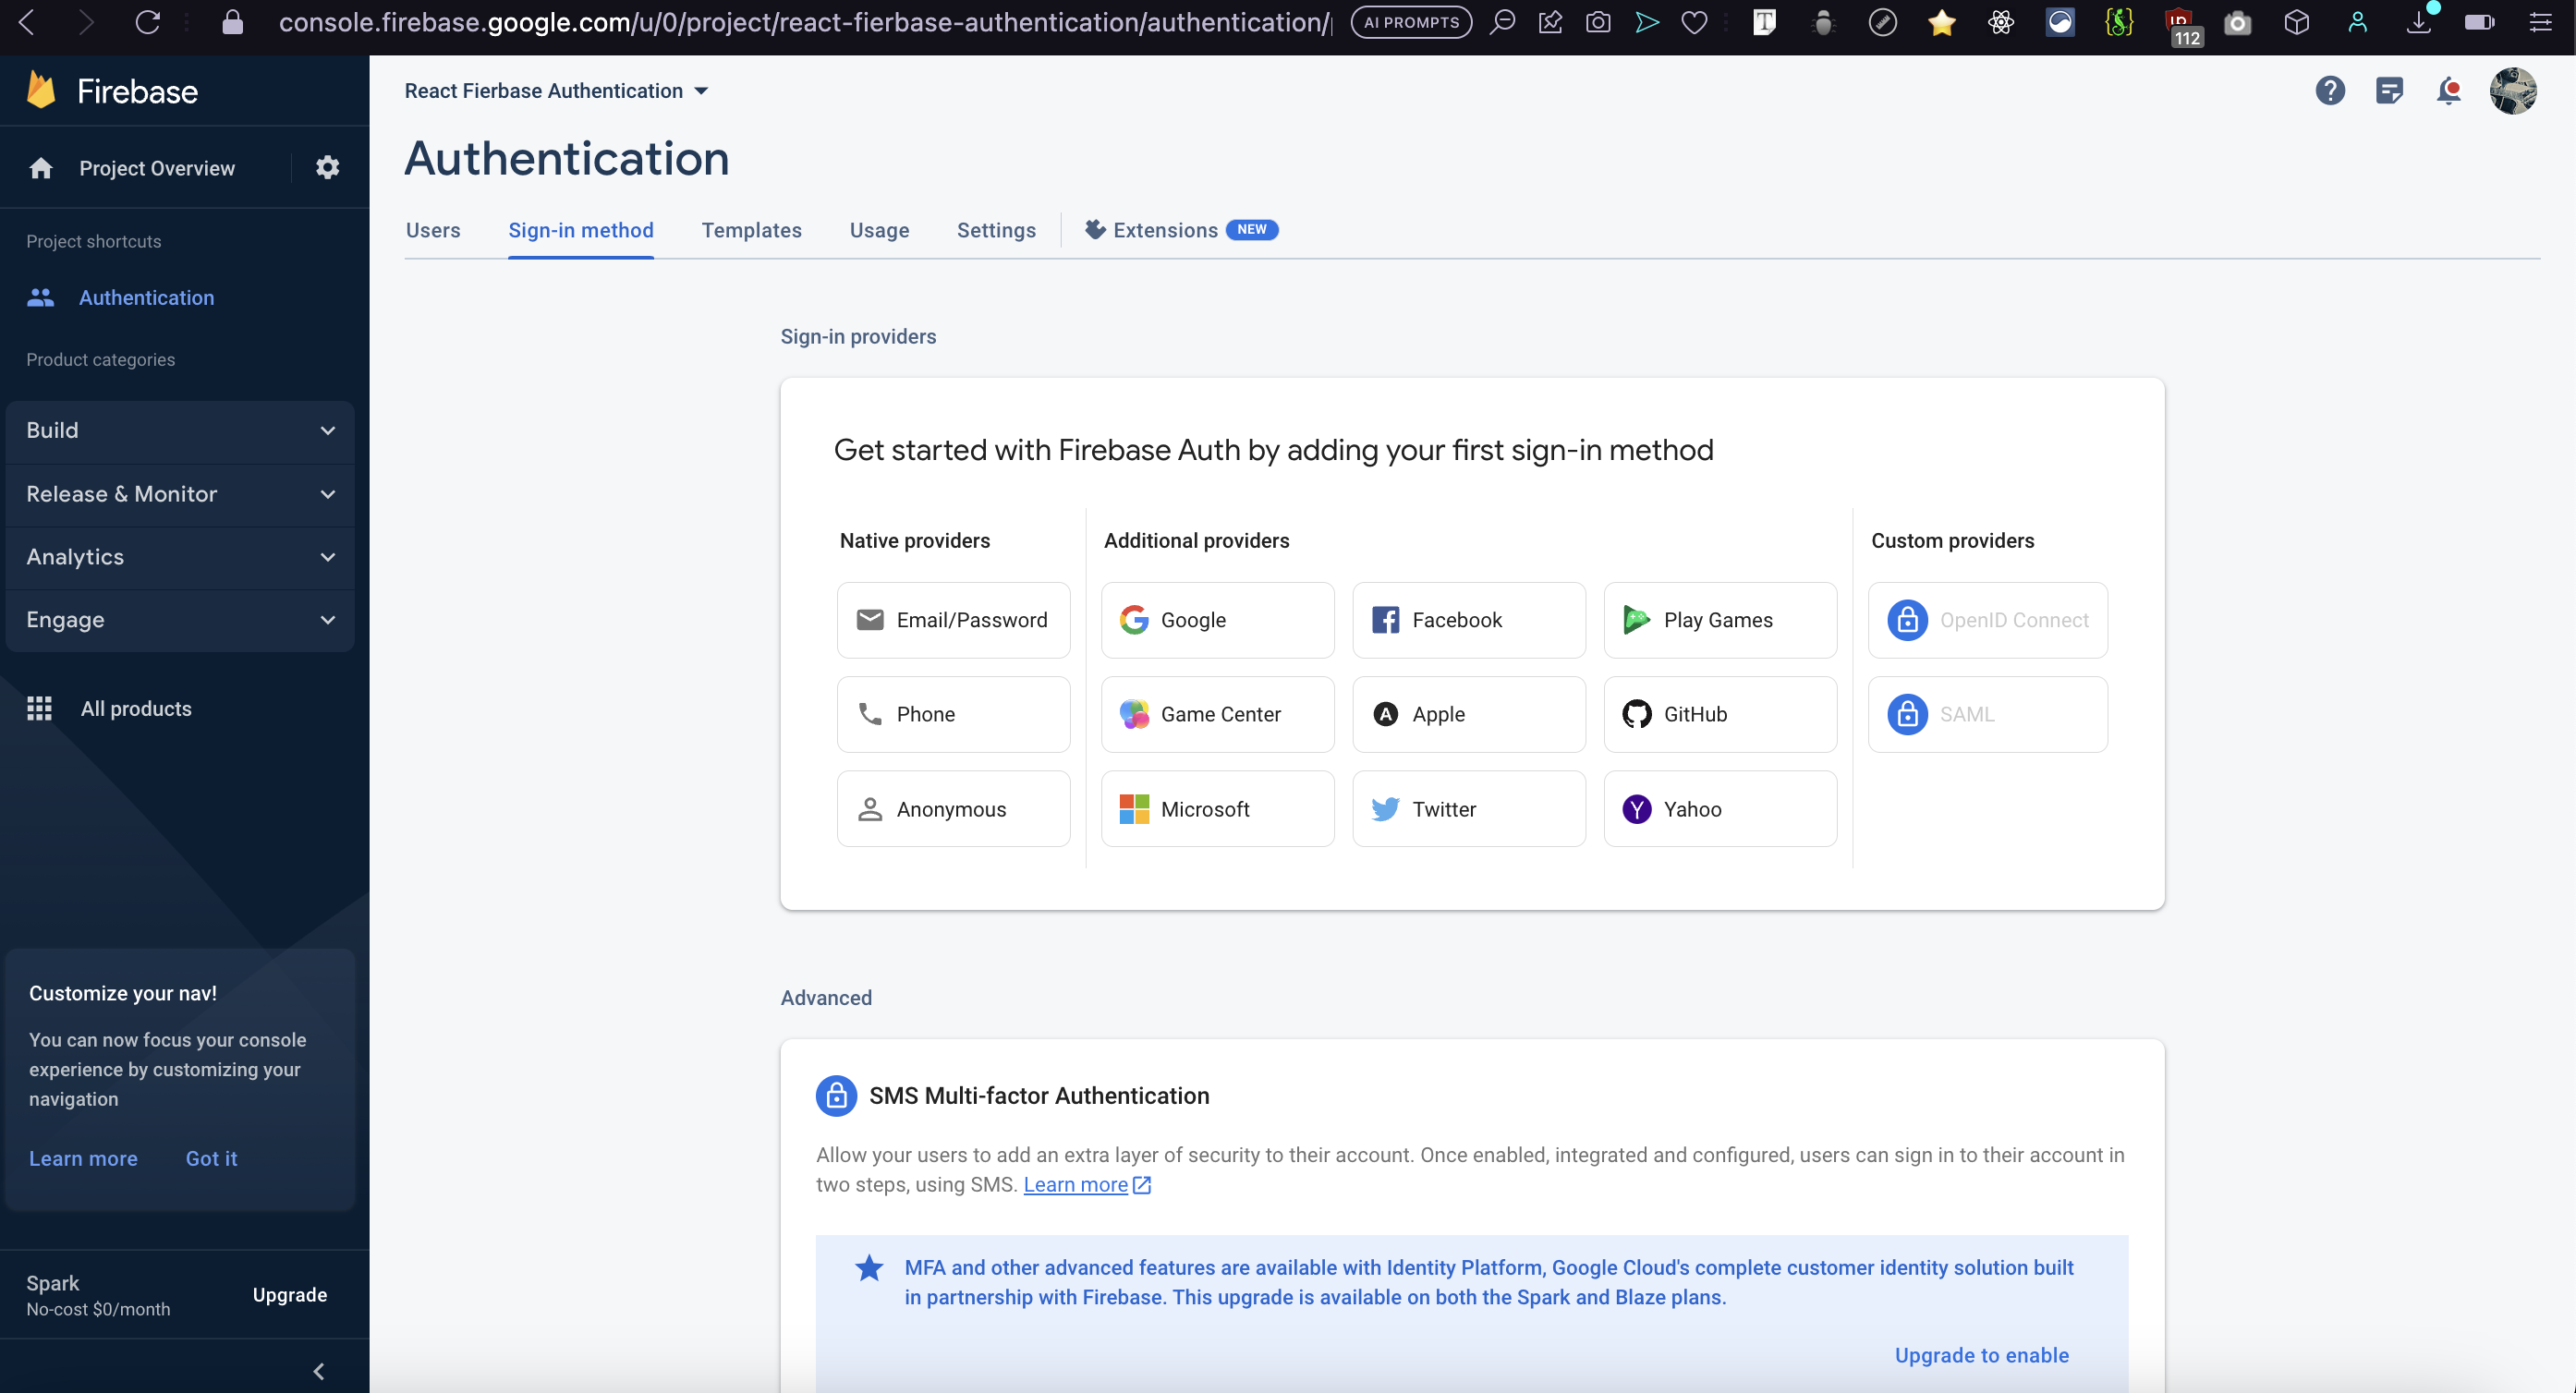
Once you have selected the "Email and Password" option, you will need to enable it for your project. Look for the "Email/Password" section and enable it by toggling the corresponding switch. This will allow users to sign in using their email and password credentials.
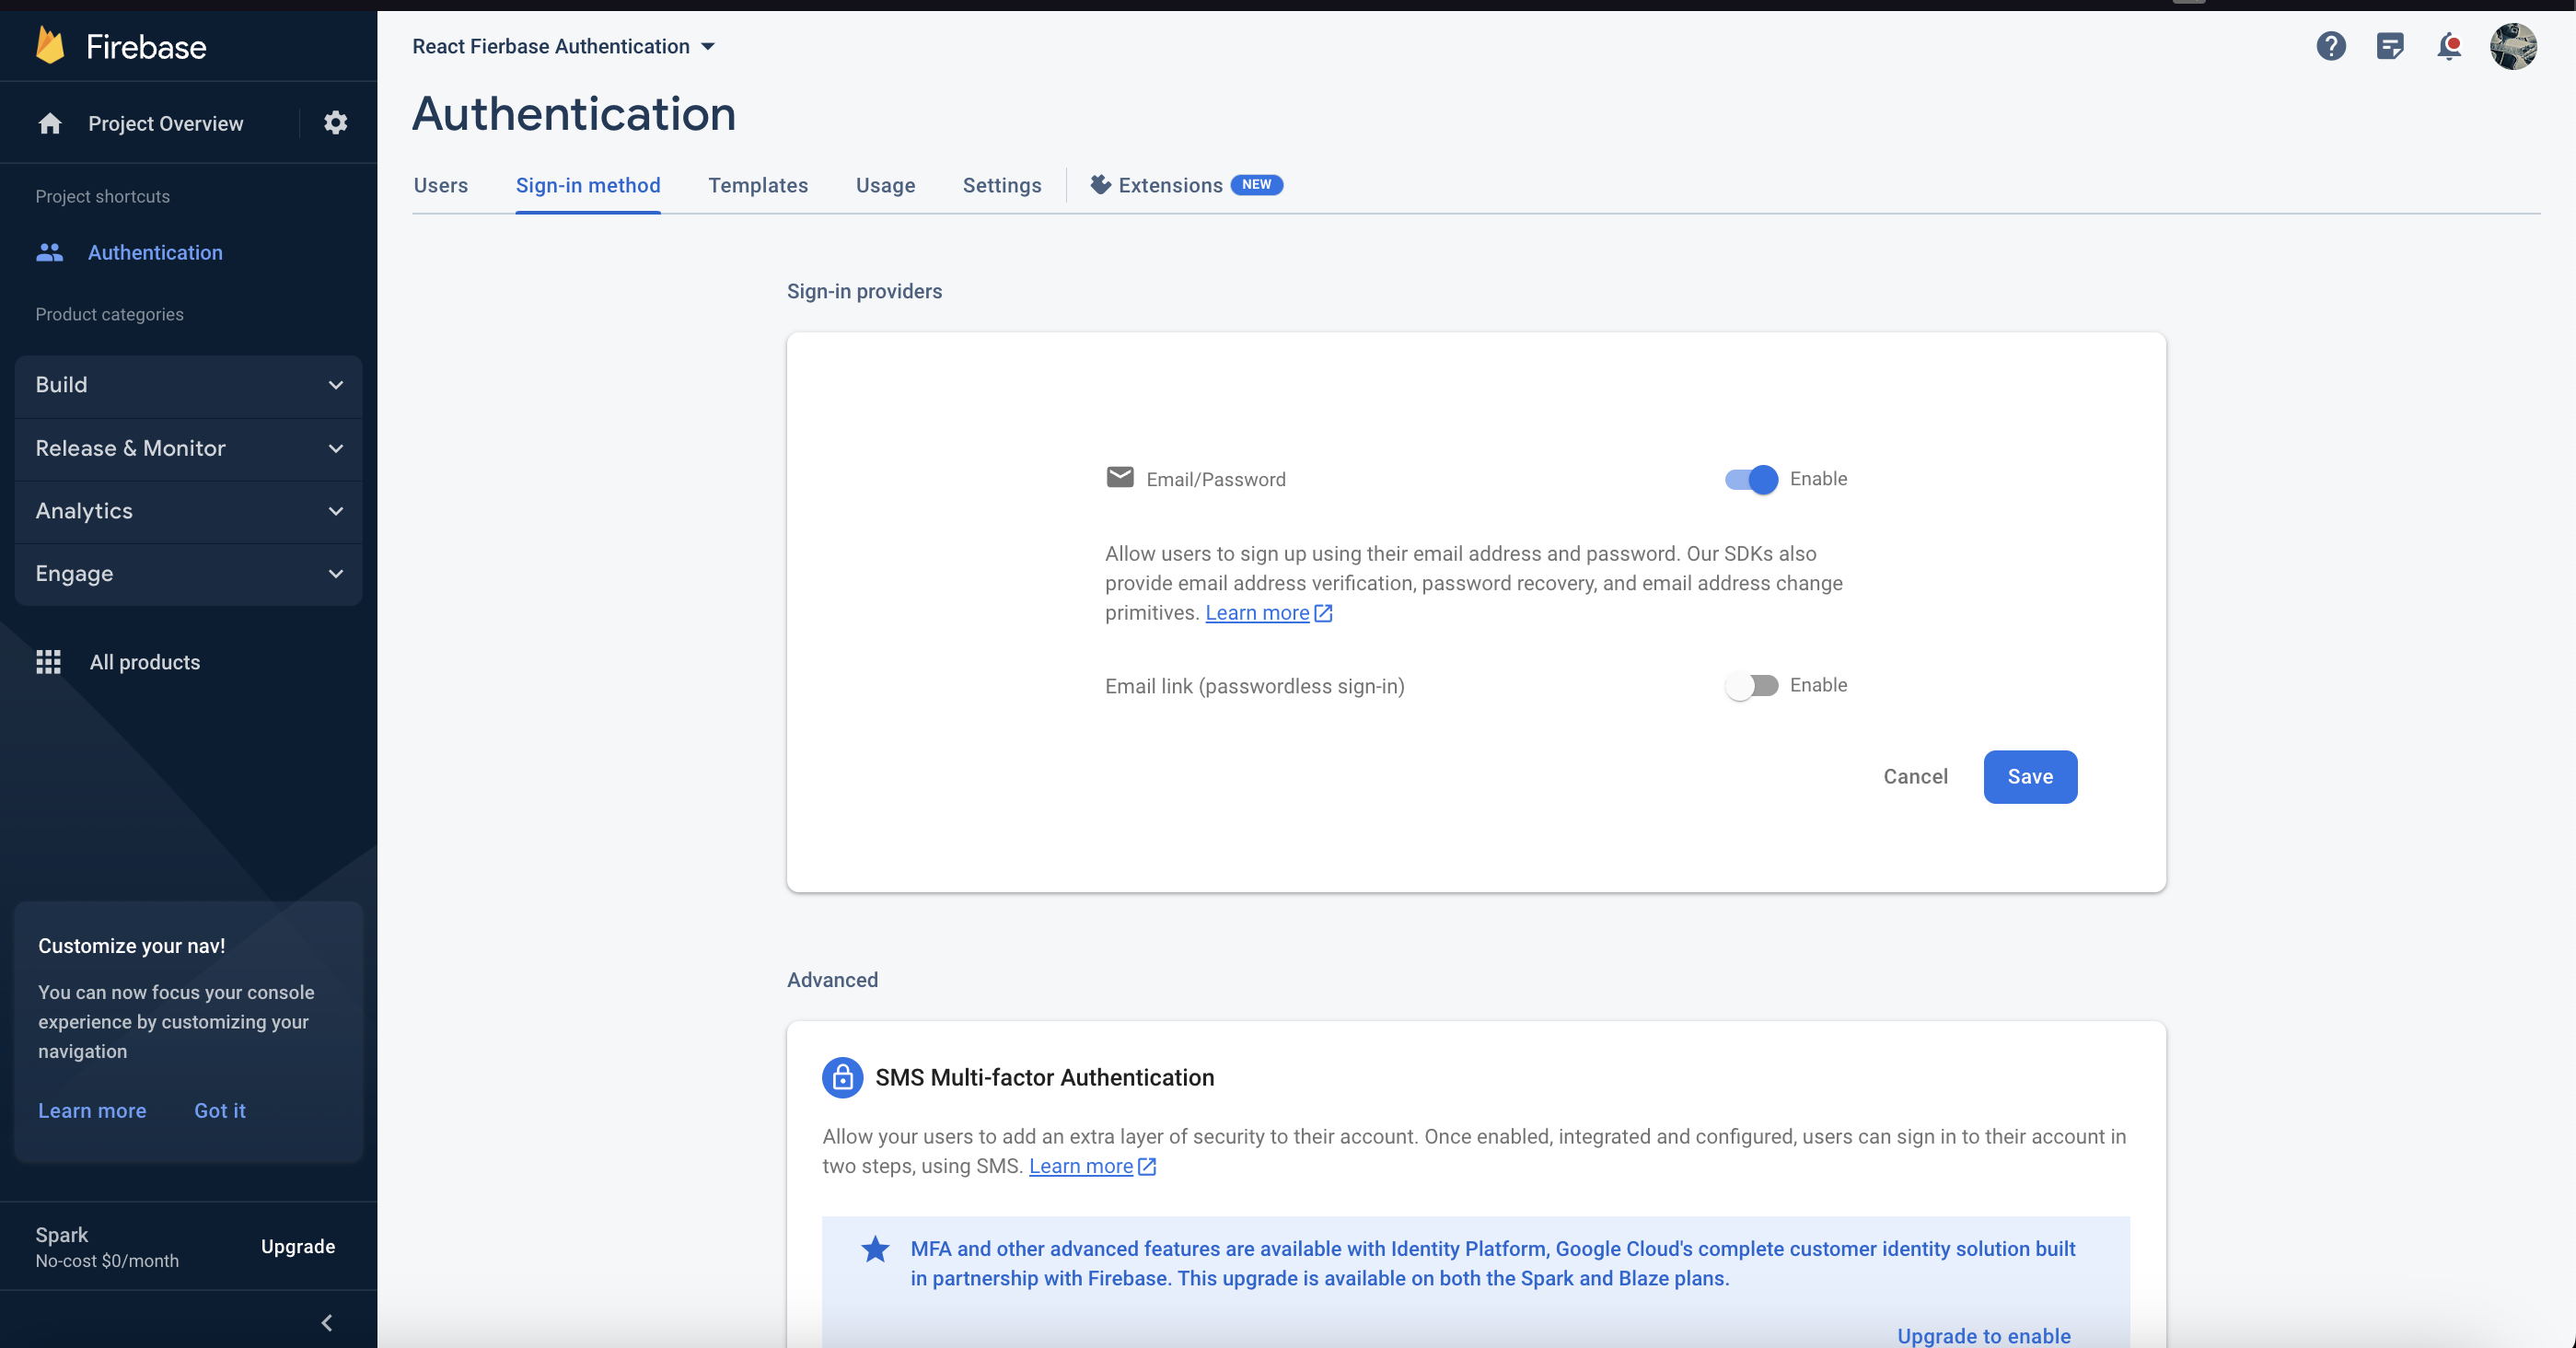
Lastly, after enabling the "Email/Password" option, remember to click on the "Save" button to save your changes. Congratulations! With this step, your Firebase project setup is now complete.
React Firebase integration
Now that we have completed the setup of our projects, we can finally begin the integration process. Follow these steps:
- Navigate to the src folder of your React project.
- Create a file named firebase.js in that folder.
- Open the Firebase console and locate the project configuration for the web app we created earlier.
- Copy the project configuration details.
- Paste the project configuration details into the firebase.js file, replacing the existing placeholder configurations with your own.
import firebase from "firebase/app";
import "firebase/auth";
import "firebase/firestore";
import "firebase/database";
import "firebase/storage";
const firebaseConfig = {
apiKey: "AIzaSyCqT8ucm9UoP0jG9qofEAKiMiuKjmXlrsI",
authDomain: "react-fierbase-authentication.firebaseapp.com",
projectId: "react-fierbase-authentication",
storageBucket: "react-fierbase-authentication.appspot.com",
messagingSenderId: "452581564877",
appId: "1:452581564877:web:67e7f9a00522d5835f2484"
};
if (!firebase.apps.length) {
firebase.initializeApp(firebaseConfig);
} else {
firebase.app(); // if already initialized, use that one
}
export default firebase;
export const firebaseRef = firebase;
export const auth = firebase.auth;
export const firestore = firebase.firestore();
export const storageRef = firebase.storage().ref();
This will initialize and export the Firebase app with your configurations.
After completing the Firebase setup, create a folder named components within the src folder. This folder will hold the various components such as Home, Profile, Login, and Signup.
To begin, let's focus on creating the Signup component and implementing the signup logic using Firebase and React.
Signup
Let’s create input fields for user email and password
<form onSubmit={onSubmit} className="form">
<input
required
type="email"
name="email"
placeholder="Email"
value={userCredentials.email}
onChange={handleOnChange}
/>
<input
required
type="password"
name="password"
placeholder="Password"
value={userCredentials.password}
onChange={handleOnChange}
/>
</form>
Now create state for the email and password by importing the useState hook from react and using it like this.
import React, { useState } from "react";
const [userCredentials, setUserCredentials] = useState({
email: "",
password: "",
});
After creating the state we will also need an onChange event listener for changing the values of email and password.
//! for getting the user email and password value
const handleOnChange = (e) => {
const fieldName = e.target.name;
const fieldValue = e.target.value;
setUserCredentials((prev) => ({ ...prev, [fieldName]: fieldValue }));
};
Here we are getting the input field name and value and then updating the credentials state using setUserCredentials function.
After creating the onChange function, we need to implement the onSubmit function. This function retrieves the user's email and password, and then calls the createUser function from the Firebase library.
To utilize Firebase in the onSubmit function, we import the firebase module from our firebase.js file, which was created in the src folder.
import firebase from "../firebase";
const onSubmit = async (e) => {
e.preventDefault();
console.log("submit clicked");
try {
const { email, password } = userCredentials;
await firebase.auth().createUserWithEmailAndPassword(email, password);
const currentUser = firebase.auth().currentUser;
console.log("currentUser", currentUser);
} catch (err) {
console.log("error", err);
}
};
In this part, we call the createUserWithEmailAndPassword function with the provided email and password as arguments. We wrap this call in a try-catch block to handle potential errors. If the function call is successful, we retrieve the current user using the Firebase auth function. In case of an error, we catch it and log it using console.log.
To provide better user experience, we can add two additional states: one for handling the loading state and another for handling any error messages that may occur.
To accomplish this, we create two more states:
const [isLoading, setIsLoading] = useState(false);
const [error, setError] = useState("");
And in cases where we want the user to navigate to the login page if they already have an account, we can utilize the useNavigate hook from react-router-dom to facilitate page navigation.
To begin, let's import the useNavigate hook:
import { useNavigate } from "react-router-dom";
After importing the useNavigate hook, we need to assign it to a variable to access the navigate function.
const navigate = useNavigate();
And finally use it in our form just above the button
<p className="navigate-text">
Already have an account?
<span onClick={() => navigate("/login")}>Log In</span>{" "}
</p>
Finally, by integrating all the pieces together, we obtain the final version of the Signup component. Here it is:
signup.jsx
import React, { useState } from "react";
import { useNavigate } from "react-router-dom";
import firebase from "../firebase";
const Signup = () => {
const [userCredentials, setUserCredentials] = useState({
email: "",
password: "",
});
const [isLoading, setIsLoading] = useState(false);
const [error, setError] = useState("");
const navigate = useNavigate();
//! for getting the user email and password value
const handleOnChange = (e) => {
const fieldName = e.target.name;
const fieldValue = e.target.value;
setUserCredentials((prev) => ({ ...prev, [fieldName]: fieldValue }));
};
const onSubmit = async (e) => {
e.preventDefault();
//! clearing error state on submit
setError("");
//! setting loading to true in order to show the loadin state
setIsLoading(true);
console.log("submit clicked");
try {
const { email, password } = userCredentials;
await firebase.auth().createUserWithEmailAndPassword(email, password);
const currentUser = firebase.auth().currentUser;
console.log("currentUser", currentUser);
} catch (err) {
//! getting the error message from firebase and setting it in the state to show
setError(err?.message || "Something went wrong!");
console.log("error", err);
}
//! setting the loading to false at the end of our submit execution
setIsLoading(false);
};
return (
<div>
<h1>Signup</h1>
<form onSubmit={onSubmit} className="form">
<input
required
type="email"
name="email"
placeholder="Email"
value={userCredentials.email}
onChange={handleOnChange}
/>
<input
required
type="password"
name="password"
placeholder="Password"
value={userCredentials.password}
onChange={handleOnChange}
/>
<p className="navigate-text">
Already have an account?{" "}
<span onClick={() => navigate("/login")}>Log In</span>{" "}
</p>
{error && <p className="error-text">{error}</p>}
<button type="submit" disabled={isLoading}>
{isLoading ? "Loading..." : " Signup"}
</button>
</form>
</div>
);
};
export default Signup;
Login
Similar to the signup process, we need a form to allow users to log in with their email and password. Like before, we'll need states for handling loading and error messages to provide feedback to the user. Additionally, we will utilize the signInWithEmailAndPassword function from Firebase to handle the login process. The rest of the implementation will be similar to the signup component. Here's the structure of our login component:
login.jsx
import React, { useState } from "react";
import { useNavigate } from "react-router-dom";
import firebase from "../firebase";
const Login = () => {
const [userCredentials, setUserCredentials] = useState({
email: "",
password: "",
});
const [isLoading, setIsLoading] = useState(false);
const [error, setError] = useState("");
const navigate = useNavigate();
//! for getting the user email and password value
const handleOnChange = (e) => {
const fieldName = e.target.name;
const fieldValue = e.target.value;
setUserCredentials((prev) => ({ ...prev, [fieldName]: fieldValue }));
};
const onSubmit = async (e) => {
e.preventDefault();
//! clearing error state on submit
setError("");
//! setting loading to true in order to show the loadin state
setIsLoading(true);
console.log("submit clicked");
try {
const { email, password } = userCredentials;
await firebase.auth().signInWithEmailAndPassword(email, password);
const currentUser = firebase.auth().currentUser;
console.log("currentUser", currentUser);
} catch (err) {
//! getting the error message from firebase and setting it in the state to show
setError(err?.message || "Something went wrong!");
console.log("error", err);
}
//! setting the loading to false at the end of our submit execution
setIsLoading(false);
};
return (
<div>
<h1>Login</h1>
<form onSubmit={onSubmit} className="form">
<input
required
type="email"
name="email"
placeholder="Email"
value={userCredentials.email}
onChange={handleOnChange}
/>
<input
required
type="password"
name="password"
placeholder="Password"
value={userCredentials.password}
onChange={handleOnChange}
/>
{/* for navigating to signup page */}
<p className="navigate-text">
Need an account?{" "}
<span onClick={() => navigate("/signup")}>Sign Up</span>{" "}
</p>
{/* Error message if there is any error */}
{error && <p className="error-text">{error}</p>}
{/* disabling the button if there is any loading means a request is in process */}
<button type="submit" disabled={isLoading}>
{isLoading ? "Loading..." : " Login"}
</button>
</form>
</div>
);
};
export default Login;
Creating user auth context
After implementing the signup and login functionalities, we need a mechanism to track and determine whether a user is currently logged in or not. Firebase provides a useful function called onAuthStateChanged that executes whenever there is a change in the user authentication state. We can leverage this function to retrieve and store the user in a state that can be accessed throughout our application.
To make the user state available throughout our app, we will create a context and wrap our entire app with it. This will enable us to access the user state from any component within our app.
To create the context, we need to import the useContext and useState hooks from React. The useContext hook allows us to consume the context, while the useState hook is used to store the user state.
Let's proceed with creating and exporting the AuthContext, for context we will create and export the AuthContext
export const AuthContext = React.createContext();
After creating the context we also need to create an AuthProvider component that will use the AuthContext and holds the user and loading state and pass it in the children components.
function AuthProvider({ children }) {
const [user, setUser] = useState(null);
const [loading, setLoading] = useState(true);
<AuthContext.Provider value={{ user, loading }}>
{children}
</AuthContext.Provider>
}
export default AuthProvider;
Finally in order to listen for the auth state changes we need useEffect hook that will be running and setting the state on every auth State change from firebase that will be something like that
useEffect(() => {
const ubsubscribe = () => {
firebase.auth().onAuthStateChanged((user) => {
// console.log("user", user);
if (user) setUser(user);
else setUser(null);
setLoading(false);
});
};
ubsubscribe();
return () => ubsubscribe();
}, []);
- In the provided code:
-
We create a function called unsubscribe.
-
unsubscribe listens to Firebase auth state changes.
-
When invoked, it receives a user object as a parameter.
-
user can be null or an actual user object.
-
Based on user value:
If user is null, we set the user state to null.
If user is a valid user object, we set the user state with the received user object.
-
We also set the isLoading state to false to indicate the completion of the authentication state fetching.
-
- In the cleanup function returned by the useEffect hook:
- We call the unsubscribe function.
- This ensures we unsubscribe from the Firebase auth state listener when the component unmounts.
- This prevents potential memory leaks or unexpected behavior.
- As a result, the final authContext component will incorporate these changes.
// authContext.jsx
import React, { useEffect, useState } from "react";
import firebase from "../firebase";
export const AuthContext = React.createContext();
function AuthProvider({ children }) {
const [user, setUser] = useState(null);
const [loading, setLoading] = useState(true);
useEffect(() => {
const ubsubscribe = () => {
firebase.auth().onAuthStateChanged((user) => {
// console.log("user", user);
if (user) setUser(user);
else setUser(null);
setLoading(false);
});
};
ubsubscribe();
return () => ubsubscribe();
}, []);
return (
<AuthContext.Provider value={{ user, loading }}>
{children}
</AuthContext.Provider>
);
}
export default AuthProvider;
Wrapping the app around authContext Provider
After creating the AuthContext, the next step is to wrap your entire app with the AuthContext Provider. This will allows the child components to access the user state and other authentication-related functionalities.
To do this, navigate to the main.jsx or index.jsx file within your src/ folder. Import the AuthProvider from the AuthContext file we created earlier and wrap your entire app with it. Here's an example:
// main.jsx
import React from "react";
import ReactDOM from "react-dom/client";
import App from "./App.jsx";
import "./index.css";
import AuthProvider from "./contexts/authContext.jsx";
ReactDOM.createRoot(document.getElementById("root")).render(
<React.StrictMode>
<AuthProvider>
<App />
</AuthProvider>
</React.StrictMode>
);
Setting up app routes in app.jsx
After creating the necessary components and context, we can proceed to set up the routes in App.jsx using React Router.
Remember this we need a few types of routes that will be something like this
- public and restricted routes
- public and unrestricted routes
- private/protected routes
- catch all or not found routes
With this information about routes we are about to setup the react router in our app.jsx component like this.
We will import required routing components from React Router DOM
import { BrowserRouter as Router, Routes, Route } from "react-router-dom";
Next, we should import the components that we have created for our application.
Please make sure to import the appropriate components based on your project's component names and file structure.
import Home from "./components/Home";
import Login from "./components/Login";
import Signup from "./components/Signup";
import UserProfile from "./components/Profile";
Finally setting up the routes that we want in our app. We will also use the Auth Context here that we created to store the user in state by using useContext hook.
import React, { useContext } from "react";
import { BrowserRouter as Router, Routes, Route } from "react-router-dom";
import { AuthContext } from "./contexts/authContext";
import Home from "./components/Home";
import Login from "./components/Login";
import Signup from "./components/Signup";
import UserProfile from "./components/Profile";
import NotFound from "./components/NotFound";
import PublicRoute from "./routes/Public";
import PrivateRoute from "./routes/Private";
import "./app.css";
function App() {
const { loading, user } = useContext(AuthContext);
console.log("user", user);
return (
<>
<Router>
{!loading && (
<Routes>
{/* public and restricted routes */}
<Route element={<PublicRoute restricted user={user} />}>
<Route element={<Login />} path="/login" />
<Route element={<Signup />} path="/signup" />
</Route>
{/* public and not restricted routes */}
<Route element={<PublicRoute user={user} />}>
<Route element={<Home />} path="/" />
</Route>
{/* protected routes */}
<Route path="/" element={<PrivateRoute />}>
<Route element={<UserProfile />} path="/profile" exact />
</Route>
{/* Not Found routes */}
<Route>
<Route path="*" element={<NotFound />} />
</Route>
</Routes>
)}
</Router>
</>
);
}
export default App;
In this setup, we are utilizing React Router v6, which consists of a Router component and Routes component that define all our routes. The Route component allows us to specify the desired URL path and the component to render when that URL path is accessed.
The Route component can accept components or nested components that can be used to wrap other components, enabling us to define logic for private or public routes.
Public and restricted routes
Public and restricted are those routes that are public but at the same time they can be restricted as well like a login or signup screen. By default login and signup pages are public but as soon as our user has logged in we no longer want our users to see the login and signup pages unless they’re logged out, so keeping in mind this behaviour, as soon the user logs in we restrict the login and signup page.
To define our public or restricted routes, we will create a folder called "routes" in our "src/" directory. Inside the "routes" folder, we will create a component called "Public.jsx". The file path for this component will be "src/routes/Public.jsx".
In the "Public.jsx" component, we will import the Outlet and navigate from React Router Dom. The component will receive props including the currentUser and restricted boolean, which will help us determine if the current route is restricted or not.
Here's an example of how the "Public.jsx" component can be implemented:
import React from "react";
import { Outlet, Navigate } from "react-router-dom";
function PublicRoute(props) {
const { restricted, user } = props || {};
return user && !restricted ? (
<Outlet />
) : !user ? (
<Outlet />
) : (
<Navigate to="/" />
);
}
export default PublicRoute;
In the "Public.jsx" component, we receive props from the parent component, "App.jsx". We check if the user exists and if the route is restricted.
If the user exists and the route is restricted, we navigate the user back to the home or default landing page using the navigate function from React Router. This ensures that a logged-in user cannot access restricted routes meant for new or unauthenticated users.
On the other hand, if the route is not restricted or the user doesn't exist, we simply return the current component or children, represented by the Outlet component. This allows the child routes defined in the parent component to be rendered.
You might be wondering from where we are getting the user or restricted prop. To access the currentUser and restricted props, we rely on the user context that was created earlier. In "App.jsx", where we render all the routes, we pass the currentUser and restricted props to the public route. This allows us to control the access and behaviour of public and restricted routes based on the user's authentication status.
By leveraging the user context and passing the necessary props, we can handle the logic for public and restricted routes effectively.
const { loading, user } = useContext(AuthContext);
{/* public and restricted routes */}
<Route element={<PublicRoute restricted user={user} />}>
<Route element={<Login />} path="/login" />
<Route element={<Signup />} path="/signup" />
</Route>
Here the restricted prop tells our app that the login and signup are public and restricted routes
Public and unrestricted routes
Public and unrestricted are those routes that we want our user to have access to no matter on their current auth state means either they are logged in or not they can have access to it, for example our home or landing page
To define public and unrestricted routes, we can use the same Public component or public route that we previously created. In this case, we won't pass the restricted prop to indicate that the route is public but not restricted. Here's an example:
{/* public and not restricted routes */}
<Route element={<PublicRoute user={user} />}>
<Route element={<Home />} path="/" />
</Route>
In this code snippet, we use the same Public component or public route, but we do not pass the restricted prop. As a result, the restricted prop inside the Public component will be false or undefined, indicating that this route is public but not restricted.
The example above demonstrates how we can render the Home component as a public and unrestricted route. You can add more public and unrestricted routes following the same pattern.
By utilizing the Public component or public route without the restricted prop, we ensure that certain routes, such as the home page, are accessible to all users, regardless of their authentication status.
Private and protected routes
Private or protected routes are those routes that we want to protect or don’t want our user to see until they log in to our app for example user profile or user profile dashboard.
To create private or protected routes, we can create another component in our routes folder called Private.jsx (located at src/routes/Private.jsx).
In this component, we import the Navigate and Outlet components from React Router, which we will use to show the protected route or navigate the user to the login page if they are not authenticated.
import { Navigate, Outlet } from "react-router-dom";
For checking the authentication status we are again using our AuthContext here, that we created and getting the user state and finally conditionally rendering the route or redirecting the user to login
import React, { useContext } from "react";
import { AuthContext } from "../contexts/authContext";
const { user } = useContext(AuthContext);
In this PrivateRoute component, we conditionally render the Outlet component, which acts as a placeholder for the child routes, if the user is authenticated. This allows the child routes to be rendered for authenticated users.
If the user is not authenticated, we navigate them to the login page using the Navigate component.
Finally the Private Route will be something like this.
import React, { useContext } from "react";
import { Navigate, Outlet } from "react-router-dom";
// import PrivateLayout from "Layouts/Private";
import { AuthContext } from "../contexts/authContext";
function PrivateRoute() {
const { user } = useContext(AuthContext);
return user ? (
<>
<Outlet />
</>
) : (
<Navigate to="/login" />
);
}
export default PrivateRoute;
Once the PrivateRoute component is created, you can import it into your App.jsx file and wrap the component you want to make private with it. For example:
{/* protected routes */}
<Route path="/" element={<PrivateRoute />}>
<Route element={<UserProfile />} path="/profile" exact />
</Route>
In this example, the Profile component is wrapped with the PrivateRoute component, which ensures that only authenticated users can access the /profile route. The PrivateRoute component checks the authentication status and renders the Outlet component if the user is authenticated, otherwise it navigates the user to the login page.
Catch all or not found routes
The catch all or not found routes are those routes that we don’t define in our app or they just don’t exists and still user tries to access them. So in order to show some broken link or some unexpected page we just add another component that just tell the user that this route does not exists and provides a button or link to go back to our app.
To handle these scenarios, we can create another component called NotFound that will be rendered when a user navigates to an undefined URL path. Here's an example implementation:
{/* Not Found routes */}
<Route>
<Route path="*" element={<NotFound />} />
</Route>
In this example, we added a Route component with the path="*" attribute, which matches any undefined or not found route. The element prop is set to the NotFound component, which will be rendered when the user accesses an undefined URL path.
By including the catch-all or not found route, we can handle scenarios where the user tries to access a route that doesn't exist and display an appropriate error message.
Folder Structure
With all the setup completed, the folder structure for your project will look something like this:
- src
- app.jsx
- main.jsx
- firebase.js
- index.css
- App.css
- contexts
- AuthContext.js
- routes
- Private.jsx
- Public.jsx
- components
- Home.jsx
- Login.jsx
- NotFound.jsx
- Profile.jsx
- Signup.jsx
Here's a breakdown of the folder structure:
- src: This is the root folder of your source code.
- app.jsx: The main entry point of your application where you set up the routes and components.
- main.jsx: The file where you wrap your app with the necessary providers and render it to the DOM.
- firebase.js: The file where you configure and initialize Firebase in your app.
- index.css: The CSS file for your index.html file.
- App.css: The CSS file for your main App component or any other component-specific styles.
- contexts: A folder to store your context files.
- AuthContext.jsx: The file where you define and export the AuthContext for managing user authentication state.
- routes: A folder to store your route-related components.
- Private.jsx: The component for handling private or protected routes.
- Public.jsx: The component for handling public or unrestricted routes.
- components: A folder to store your application components.
- Home.jsx: The component for the home or landing page.
- Login.jsx: The component for the login page.
- NotFound.jsx: The component for handling not found or catch-all routes.
- Profile.jsx: The component for the user profile page.
- Signup.jsx: The component for the signup page.
This folder structure provides a logical organization for your project files, separating components, routes, and other resources to enhance maintainability and scalability.