How to Add Custom Fonts in Next.js with Tailwind CSS
Feb 2024 · 6 min
Discover the straightforward steps to incorporate custom fonts into your Next.js project using Tailwind CSS. Elevate your web design effortlessly and give your applications a distinctive typographic touch. Learn the process from import to optimization for a visually appealing and unique user experience.
Overview
So, your Next.js site comes with a default set of fonts – a decent start, but let's admit it, we all yearn for a touch of individuality, right?
In this casual yet informative tutorial, we're uncovering the secrets to elevate your Next.js site with fonts that resonate with your unique style. We're diving into the world of custom fonts – the ones that align seamlessly with your site's personality.
In this guide, we'll walk through the process of seamlessly incorporating custom fonts into your Next.js site, harnessing the power of the next/font package and Tailwind CSS. Get ready for a hands-on journey as we navigate a series of essential configuration steps:
- Loading Fonts from Google Fonts: We'll delve into the intricacies of using next/font/google to fetch fonts from the expansive Google Fonts library. This step lays the foundation for infusing your site with a diverse range of typographic styles.
- Creating Custom Font Families in Tailwind Config: With our CSS variables in hand, let's dive into your Tailwind config. Discover how to use these variables to create unique font styles. This ensures that the fonts on your Next.js site look well-organized and seamlessly blend together for a smooth and unified typographic vibe.
- Using custom fonts Inside components With the tailwind configurations for custom fonts we will see how we can use the custom fonts in our components with ease.
But wait, there's more!
- Local Font Files with next/font/local: As an added bonus, discover how to leverage next/font/local to seamlessly integrate local font files into your project. This ensures that your custom font choices are not only diverse but also accessible even when offline.
Get ready to elevate your Next.js site's visual appeal with the finesse of tailored typography. Let's dive in, step by step, and make your web design truly stand out! 🎨🔠
Loading Fonts from Google Fonts
In your _app.jsx/tsx file (or layout.tsx/jsx if you're using the app router), bring in the fonts you want from next/font/google. Utilize the variable configuration prop to specify the variable name you want to use. This variable will help generate a CSS --var for each font. Additionally, if you have specific font weights in mind, go ahead and define them. Here's a glimpse of how your code will shape up:
// app/layout.tsx
// Import Poppins font from next/font/google
import { Poppins } from "next/font/google";
// Define Poppins font with specific configurations
const poppins = Poppins({
subsets: ["latin"],
display: "swap",
variable: "--font-poppins", // you can use the 'poppins' variable in your styles or components
weight: ["100", "200", "300", "400", "500", "600", "700", "800", "900"],
});
After creating the Poppins font, it's time to integrate it into your body tag. Use the variable name you assigned when defining the font.
<html lang="en">
<body className={`${poppins.variable}`}>
</body>
</html>
So with all this your final layout.tsx will look like this.
"use client";
// Import the Poppins font from next/font/google
import { Poppins } from "next/font/google";
import Navbar from "@/components/Navbar";
import Footer from "@/components/Footer";
import "./globals.css";
// Define Poppins font with specific configurations
const poppins = Poppins({
subsets: ["latin"],
display: "swap",
variable: "--font-poppins",
weight: ["100", "200", "300", "400", "500", "600", "700", "800", "900"],
});
// RootLayout component
export default function RootLayout({
children,
}: {
children: React.ReactNode;
}) {
return (
<html lang="en">
{/* Apply the Poppins font to the body tag */}
<body className={`${poppins.variable}`}>
<Navbar />
{children}
<Footer />
</body>
</html>
);
}
Creating Custom Font Families in Tailwind Config
Now that your font is ready and gracing the body tag, it's time to head over to your tailwind.config.ts file and set up the custom fontFamily that will sprinkle typographic charm across your project.
Navigate to theme → extend → fontFamily and assign it a name. The value for this name will be the variable you assigned to the font during its creation. It's as simple as:
import type { Config } from "tailwindcss";
const config: Config = {
content: [
"./src/pages/**/*.{js,ts,jsx,tsx,mdx}",
"./src/components/**/*.{js,ts,jsx,tsx,mdx}",
"./src/app/**/*.{js,ts,jsx,tsx,mdx}",
],
theme: {
extend: {
fontFamily: {
poppins: ["var(--font-poppins)"],
},
},
},
plugins: [],
};
This snippet showcases how to extend the fontFamily section in your Tailwind CSS config, introducing the "poppins" font with its corresponding variable. If you have more fonts to add, you can simply follow the same pattern and add more fonts in your tailwind configs.
Using custom fonts Inside components
Now that you've expanded the theme with a new fontFamily, it's time to incorporate these fonts into your components. Whenever you want to utilize the added fonts, simply request that font-family in your Tailwind classNames by prefixing the font-family with "font-". For instance:
<p className="font-poppins">
This will be rendered with the Poppins font family
</p>
You can also specify the font-weight you wish to use:
<p className="font-poppins font-normal">
This will be rendered with the Poppins font family, and the font-weight will be set to 400.
</p>
To make things even simpler, create a Text component like this:
import React from "react";
const Text: React.FC = () => (
<p className="font-poppins font-normal">
This will be rendered with the Poppins font family, and the font-weight will be set to 400.
</p>
);
export default Text;
Now, using your custom fonts is as easy as dropping this Text component wherever you need it in your project.
Using Local Font Files with next/font/local
Until now you saw how you can use the next/font with google fonts but what if you want to use a font that is not in google fonts or what if you have a font file that you wish to use? well you don’t need to worry, we got that covered as well.
Now you will see how we can utitlze the next/font/local and use our own local font files. For this you need to import the localFont from the package and you need to place your font files inside the public folder something like this
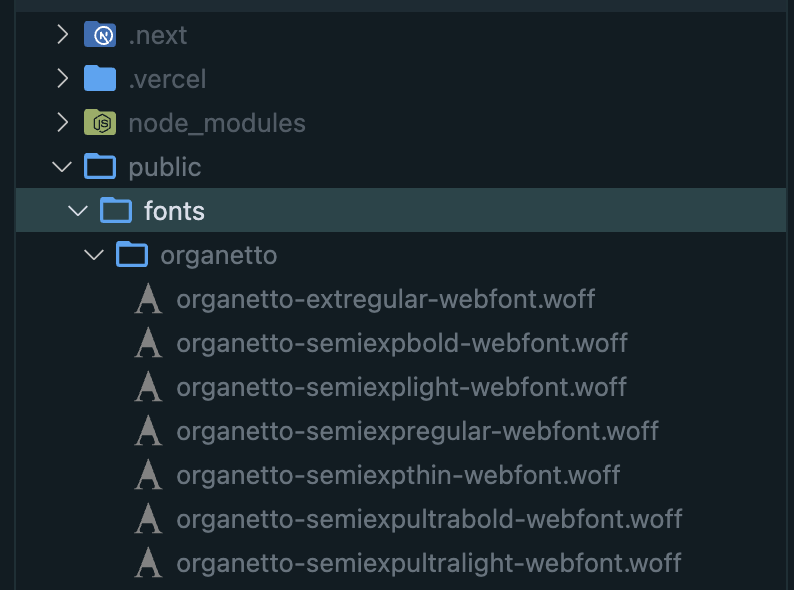
Now, let's get down to business. Import the localFont from next/font/local:
import localFont from "next/font/local";
Next, generate the font. Based on the desired font-weight, import the corresponding file in the src array. Assign a variable name at the end:
const organetto = localFont({
src: [
{
path: "../../public/fonts/organetto/organetto-semiexpthin-webfont.woff",
weight: "100",
style: "normal",
},
{
path: "../../public/fonts/organetto/organetto-semiexpultralight-webfont.woff",
weight: "200",
style: "normal",
},
{
path: "../../public/fonts/organetto/organetto-semiexplight-webfont.woff",
weight: "300",
style: "normal",
},
{
path: "../../public/fonts/organetto/organetto-extregular-webfont.woff",
// path: "../../public/fonts/organetto/organetto-semiexpregular-webfont.woff",
weight: "400",
style: "normal",
},
{
path: "../../public/fonts/organetto/organetto-semiexpbold-webfont.woff",
weight: "700",
style: "normal",
},
{
// path: "../../public/fonts/organetto/organetto-semiextultrabold-webfont.woff",
path: "../../public/fonts/organetto/organetto-semiexpultrabold-webfont.woff",
weight: "800",
style: "normal",
},
],
variable: "--font-organetto",
});
Now, following the same steps as before, include the new font variable in the body tag alongside Poppins:
<html lang="en">
<body className={`${poppins.variable} ${organetto.variable}`}>
<Navbar />
{children}
<Footer />
</body>
</html>
Don't forget to add the new font family in your Tailwind CSS config:
fontFamily: {
poppins: ["var(--font-poppins)"],
organetto: ["var(--font-organetto)"],
}
Voila! Now, you can simply use the organetto font along with the poppins in your project:
<p className="font-organetto font-normal">
This will be rendered with the Organetto font family, and the font-weight will be set to 400.
</p>
Conclusion
So, there you have it! Adding some flair to your website design with custom fonts can really make it stand out. In this guide, we've explored different ways to smoothly bring in fonts to your Next.js project. Whether you're tapping into the magic of Google Fonts with next/font, shaping your own font families in Tailwind CSS, or delving into the world of local font files using next/font/local – you now have a bunch of tricks up your sleeve to spruce up your text game. Go ahead, play around, and let your creativity shine through the fonts that match your project's vibe. Happy coding! 🎨💻✨